These are some of my furniture and general woodworking projects.
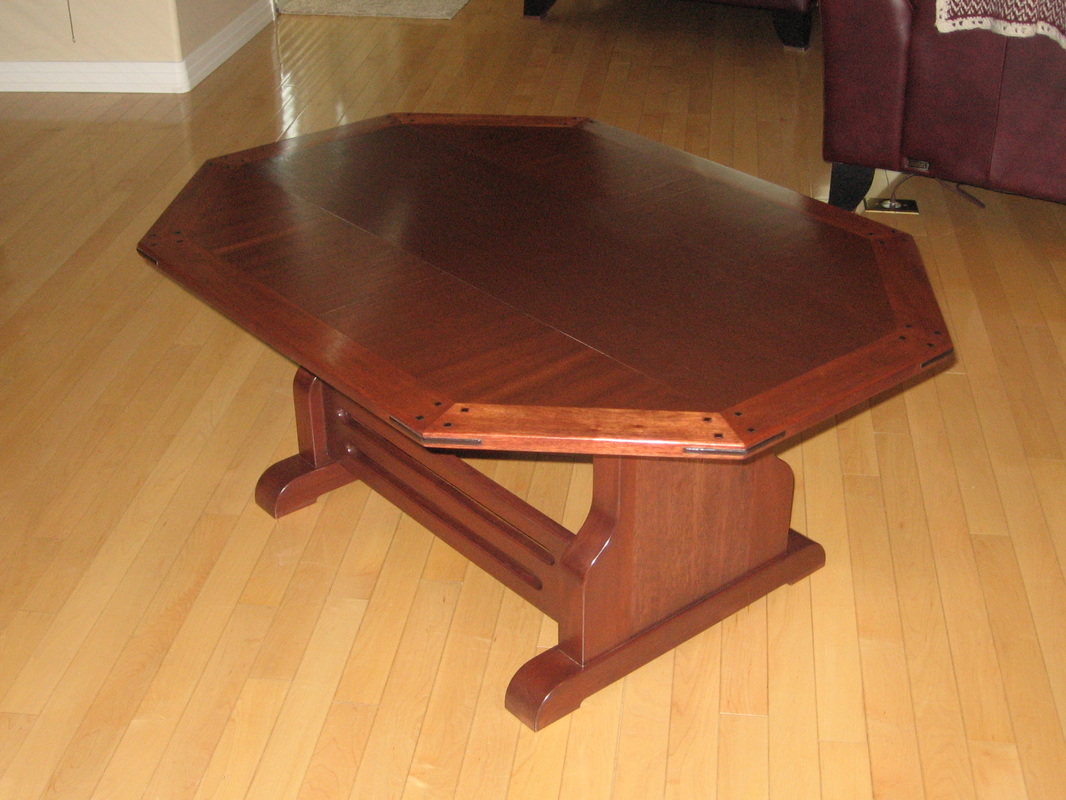
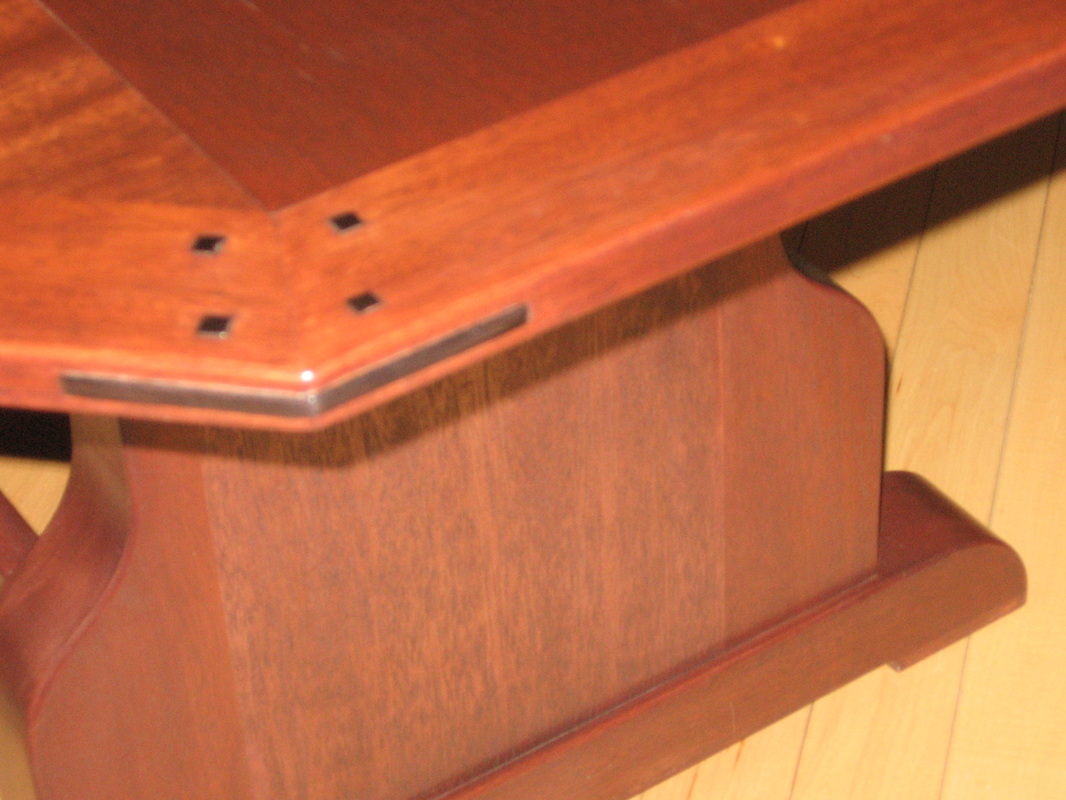
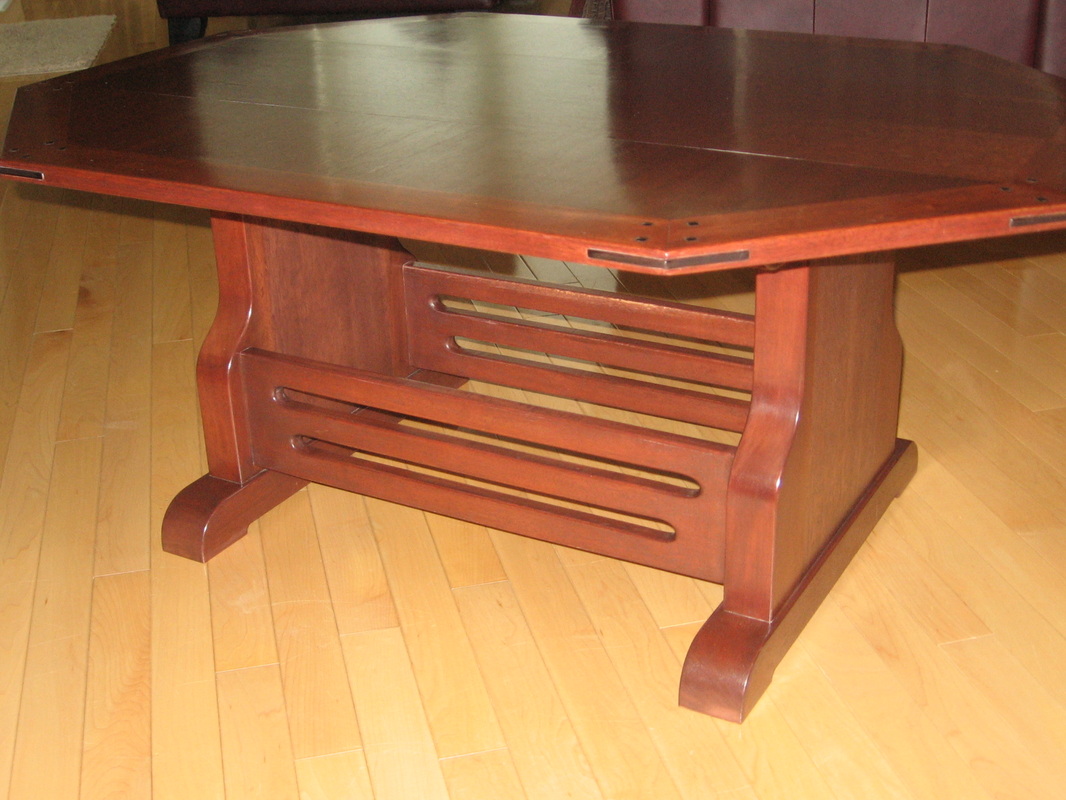
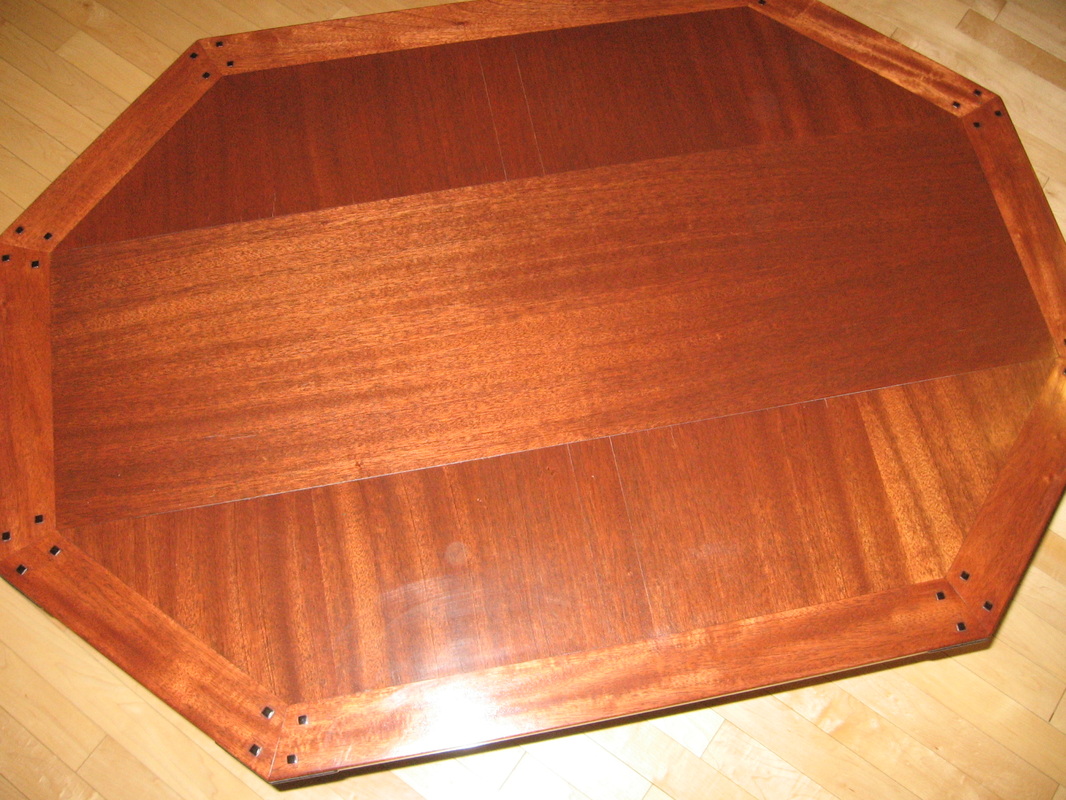
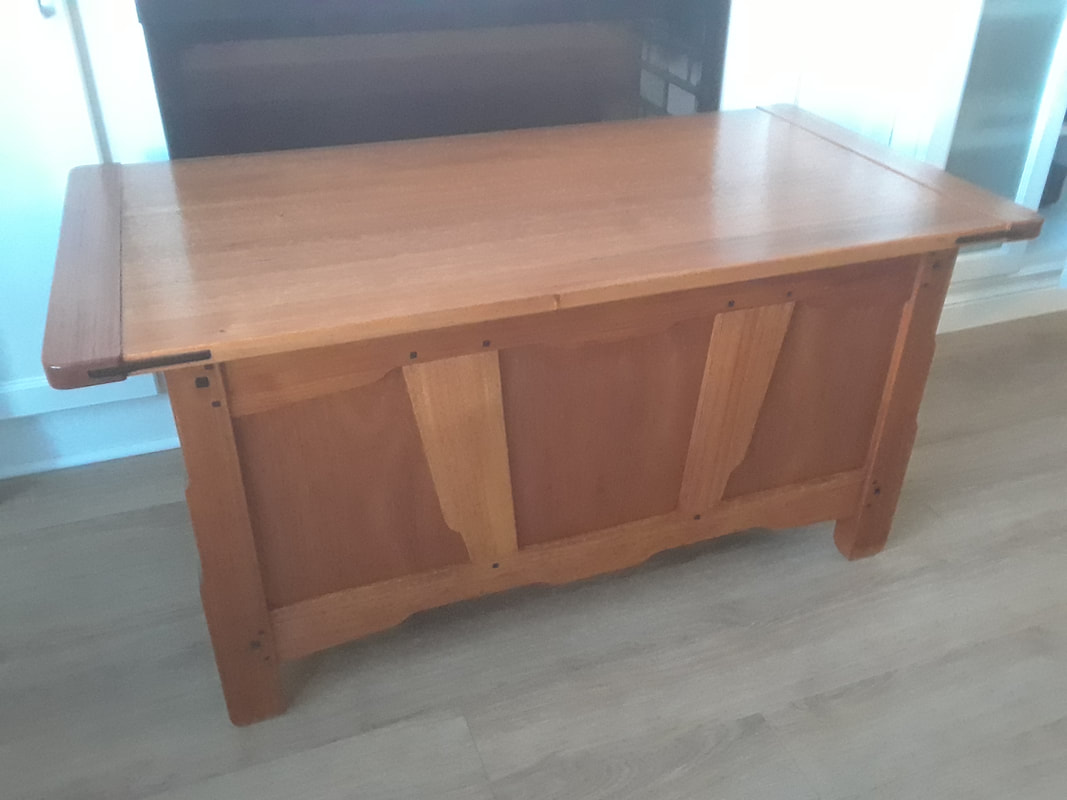
The first Greene & Greene style piece that I made was a coffee table, based on a photo in a magazine of the one in the Gamble House in Pasadena, CA. The table has many classic Greene & Greene features including the pegs and splines that I used as my web-site name. For more information and explanation, please visit my Greene & Greene page where I have provided a brief introduction.
|
|
|
|
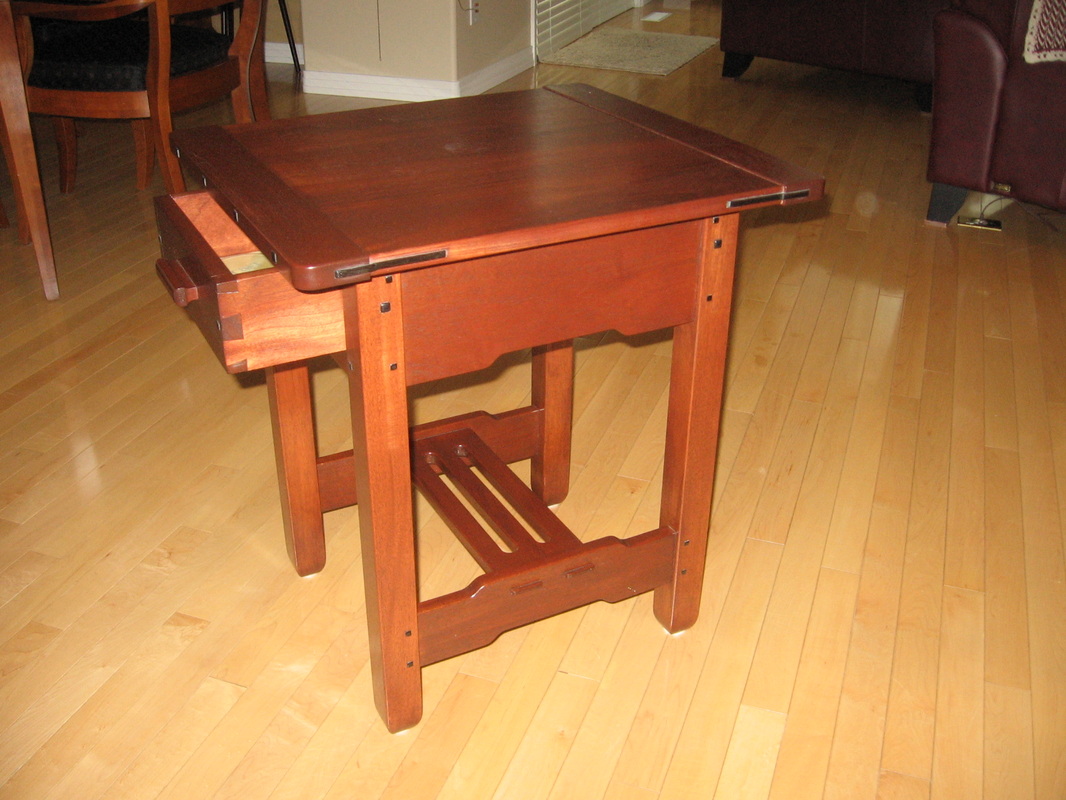
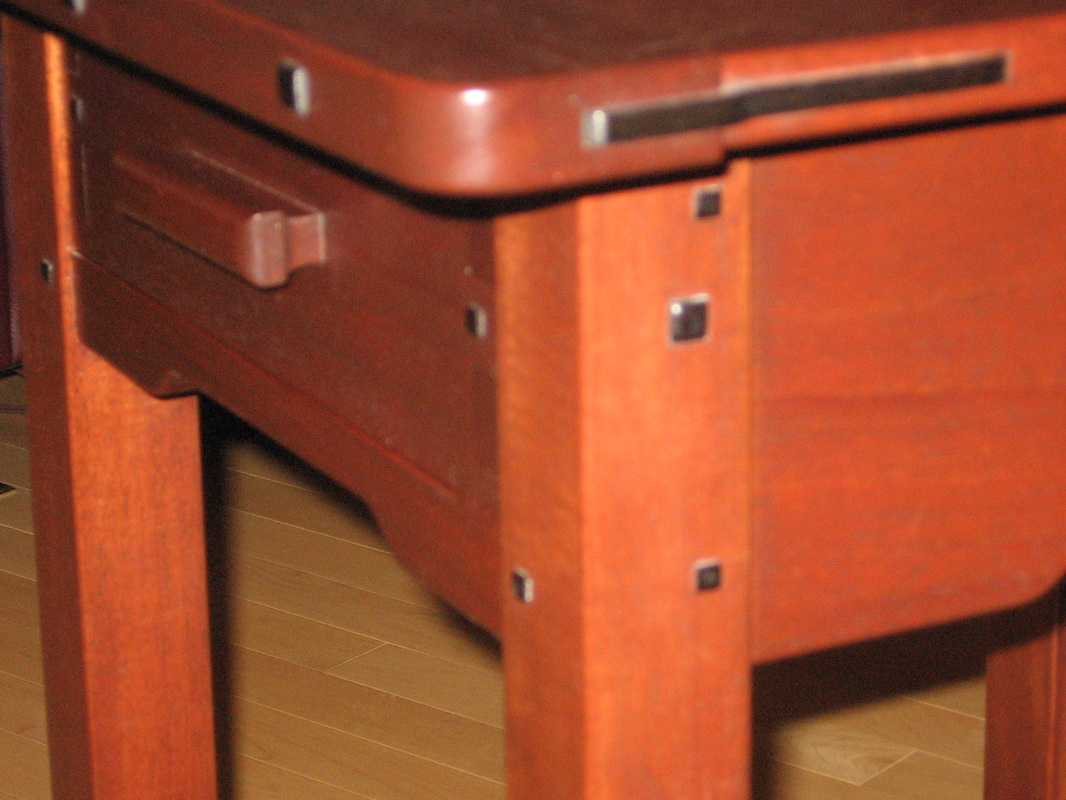
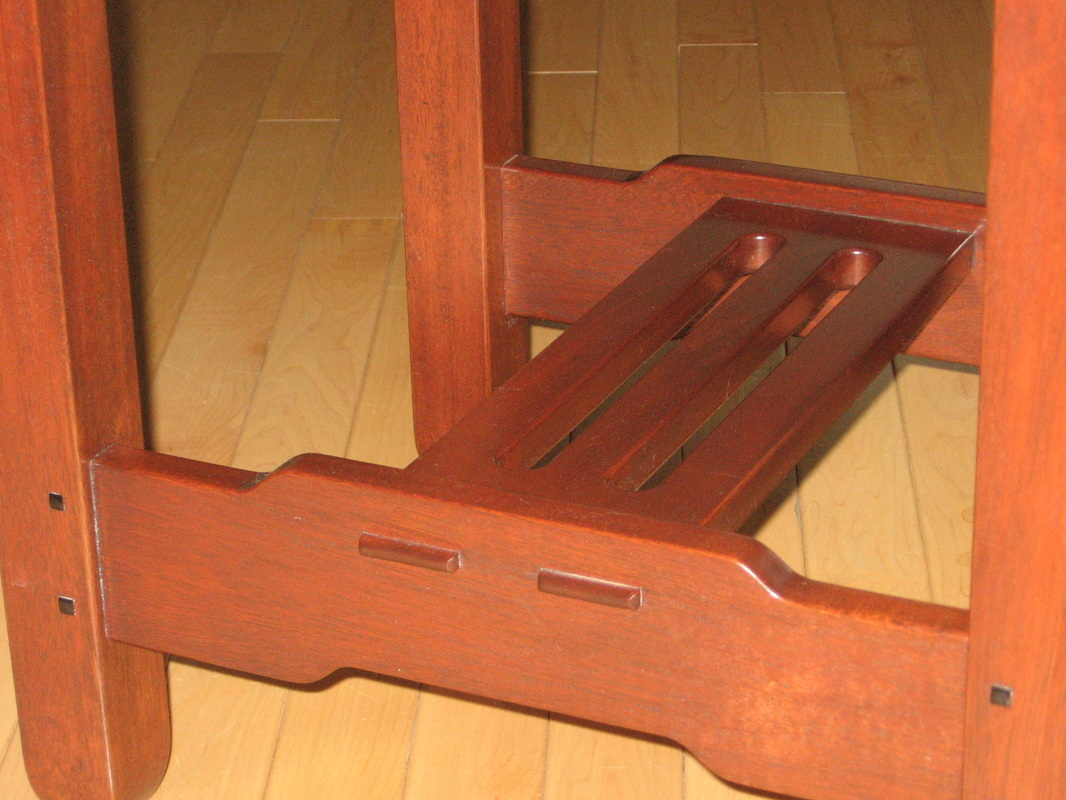
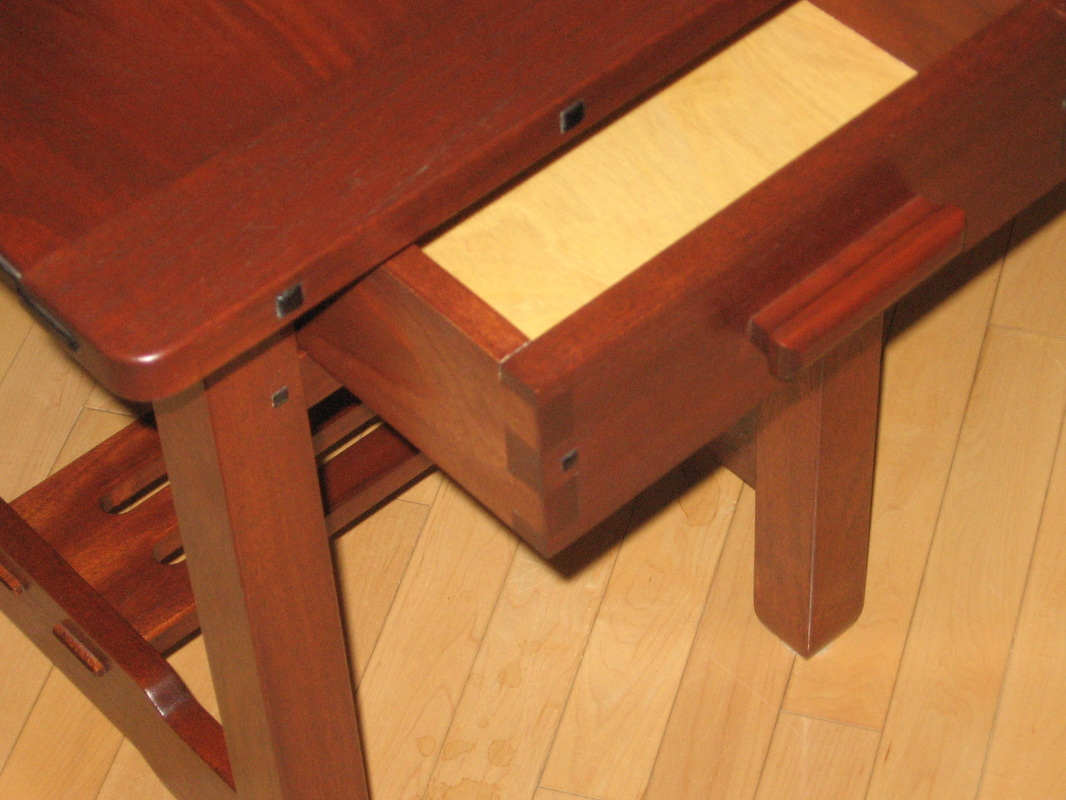
I also made a pair of side tables using design elements from Greene & Greene, but not based on any particular original piece that I am aware of.
|
|
|
|
|
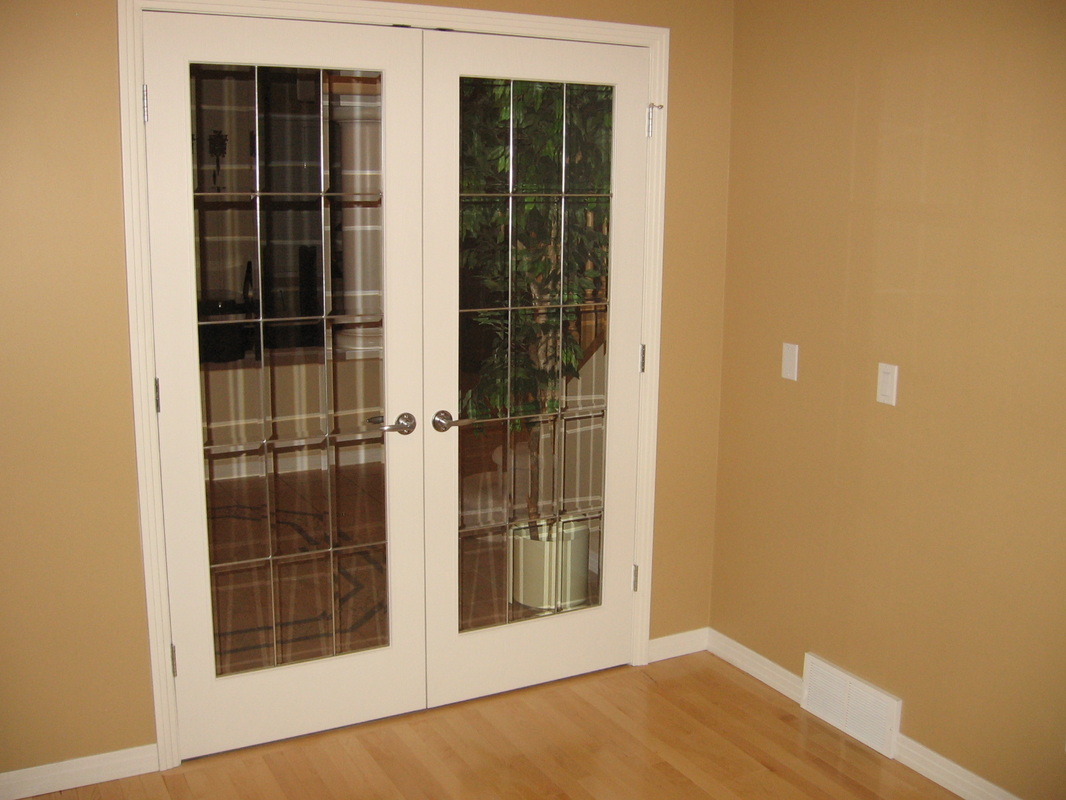
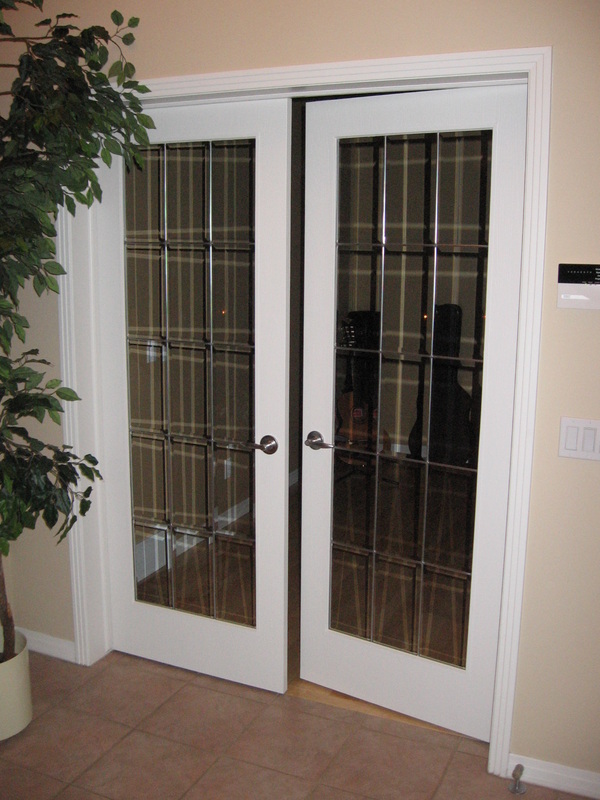
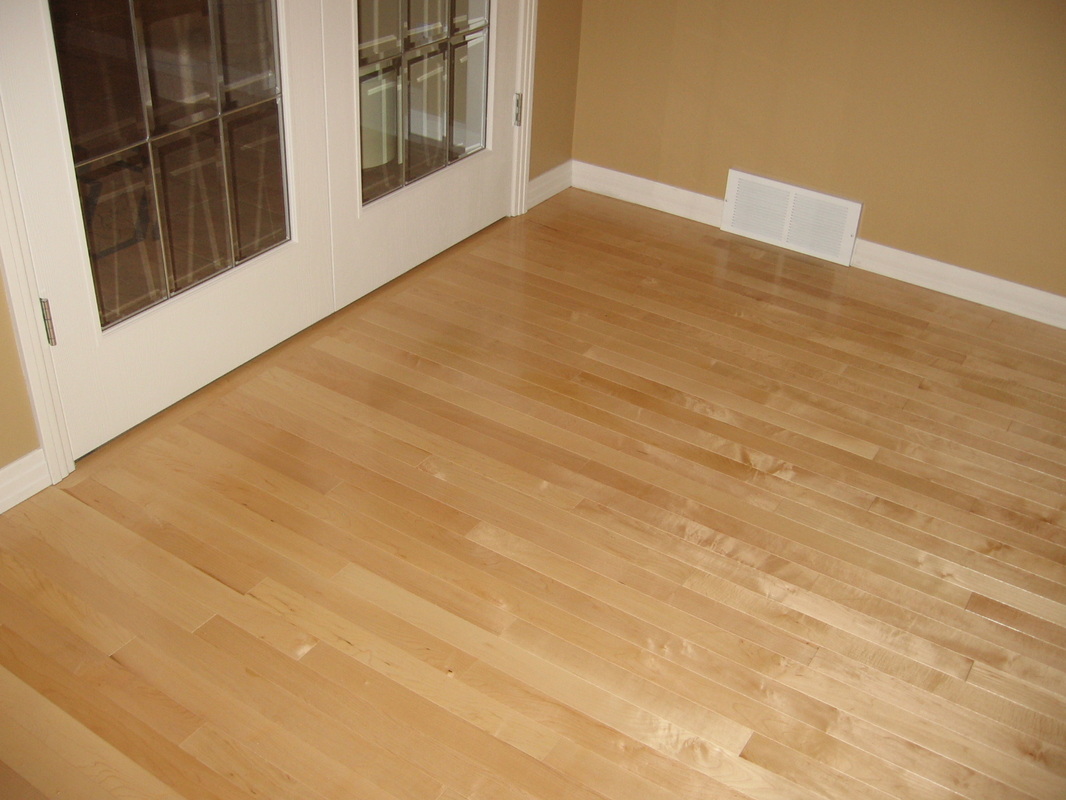
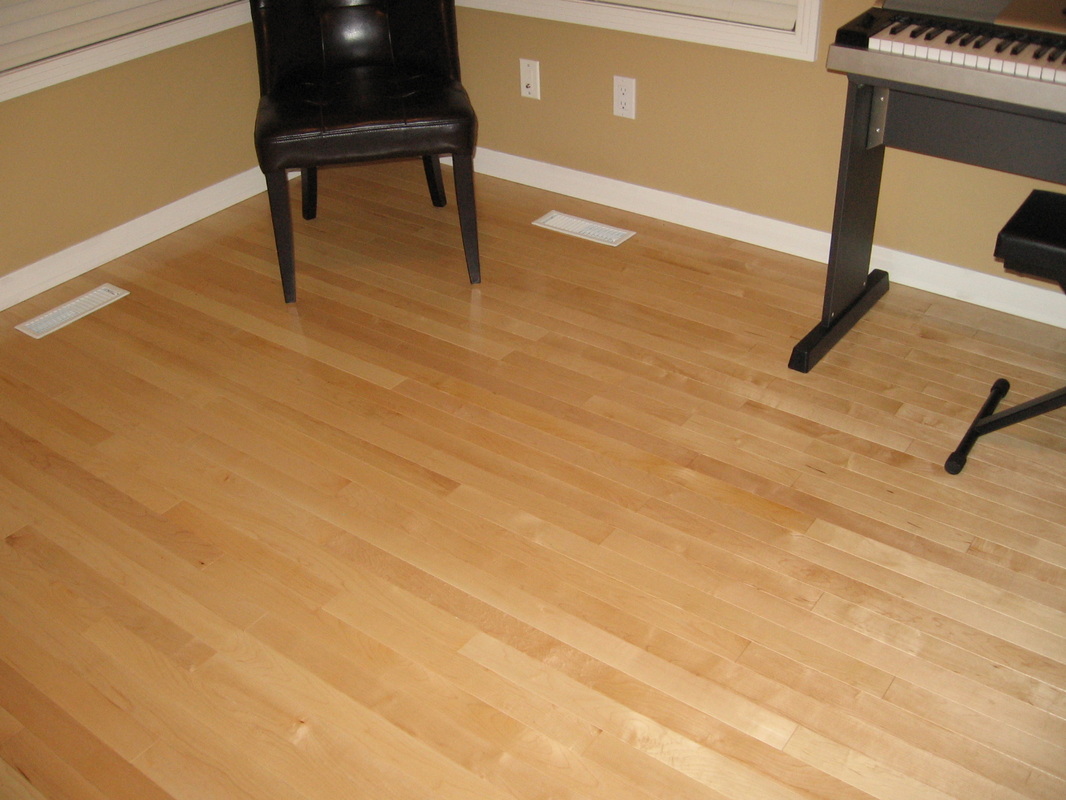
I installed French doors and hardwood flooring in my den/music room. |
|
|
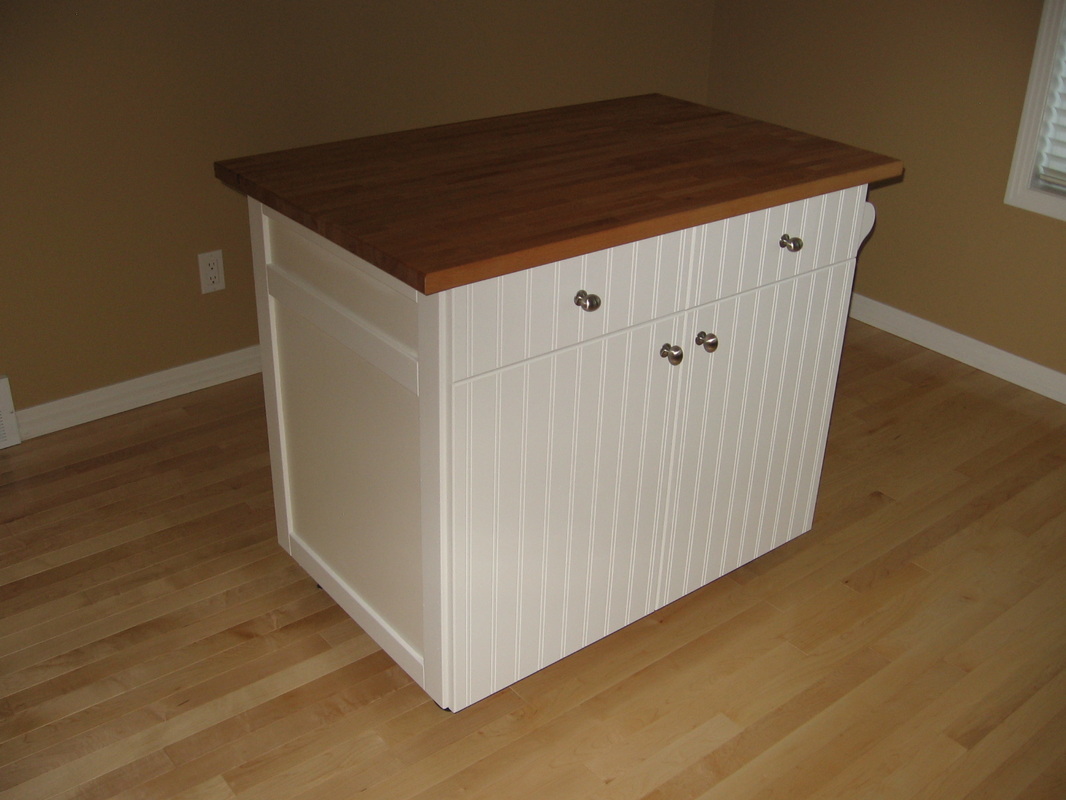
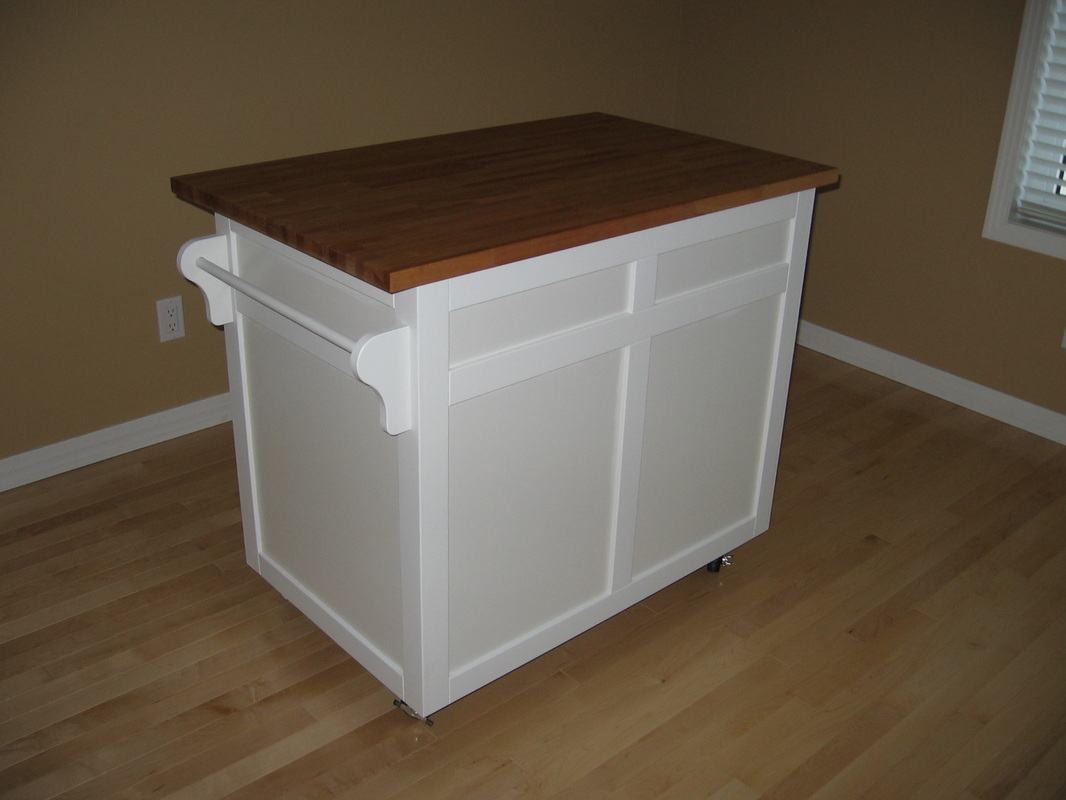
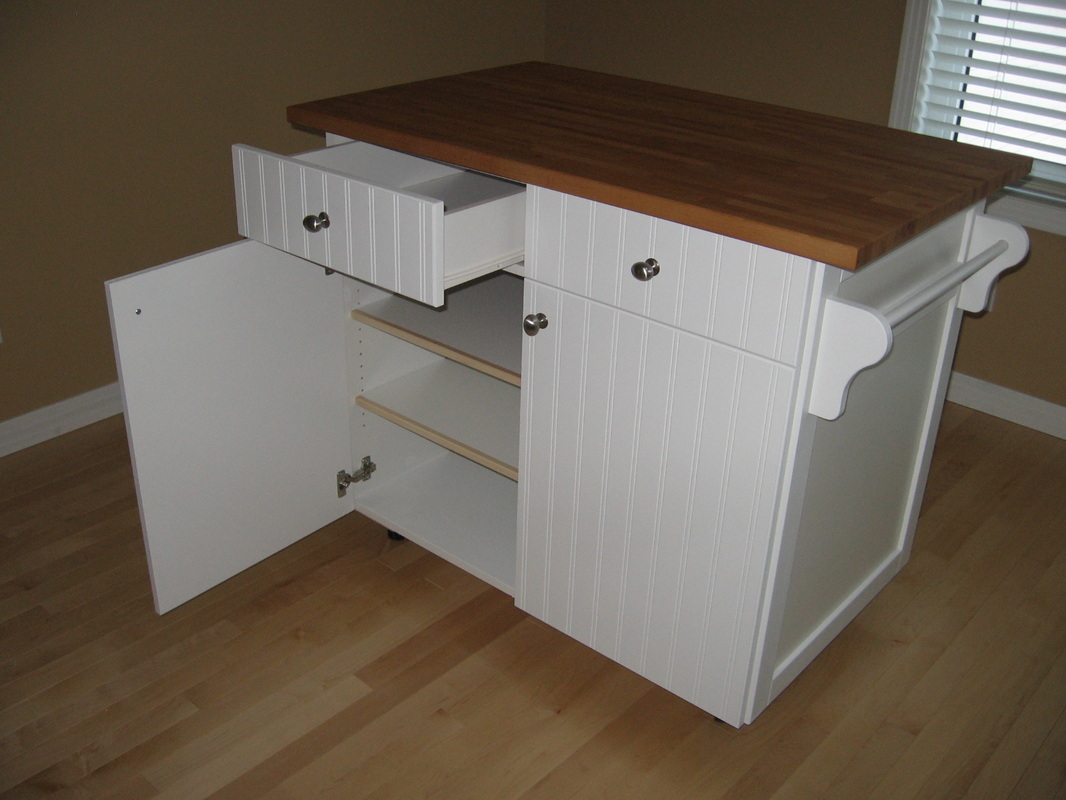
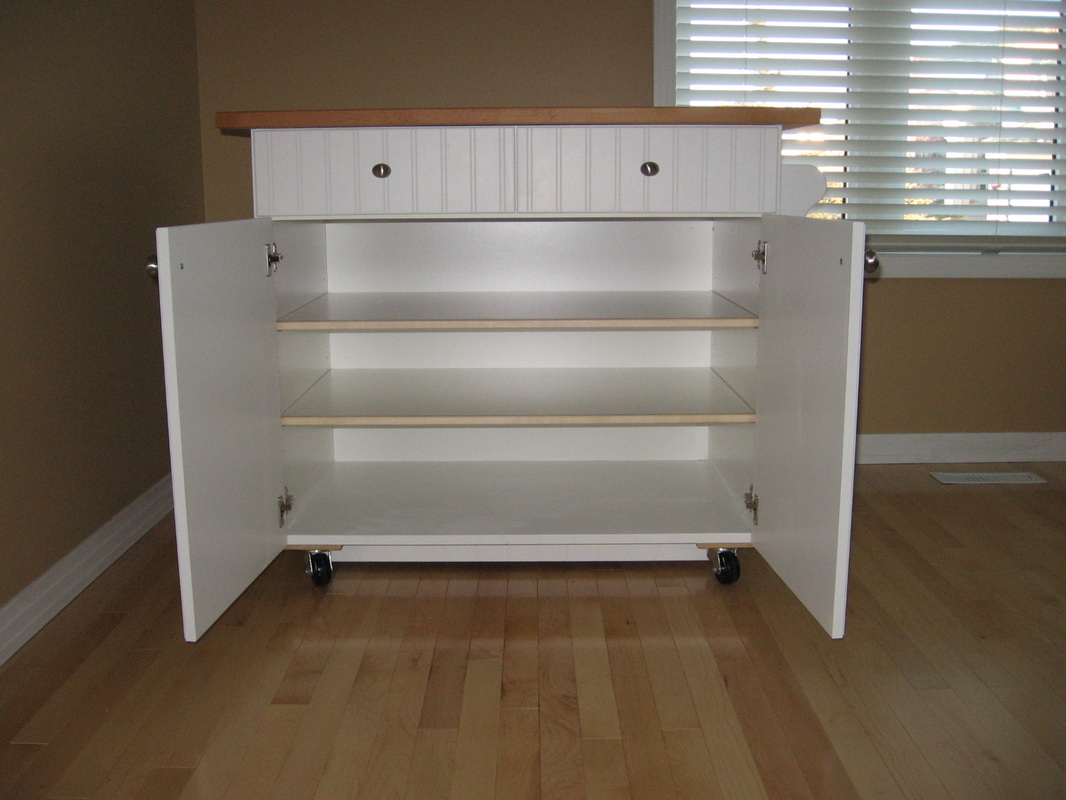
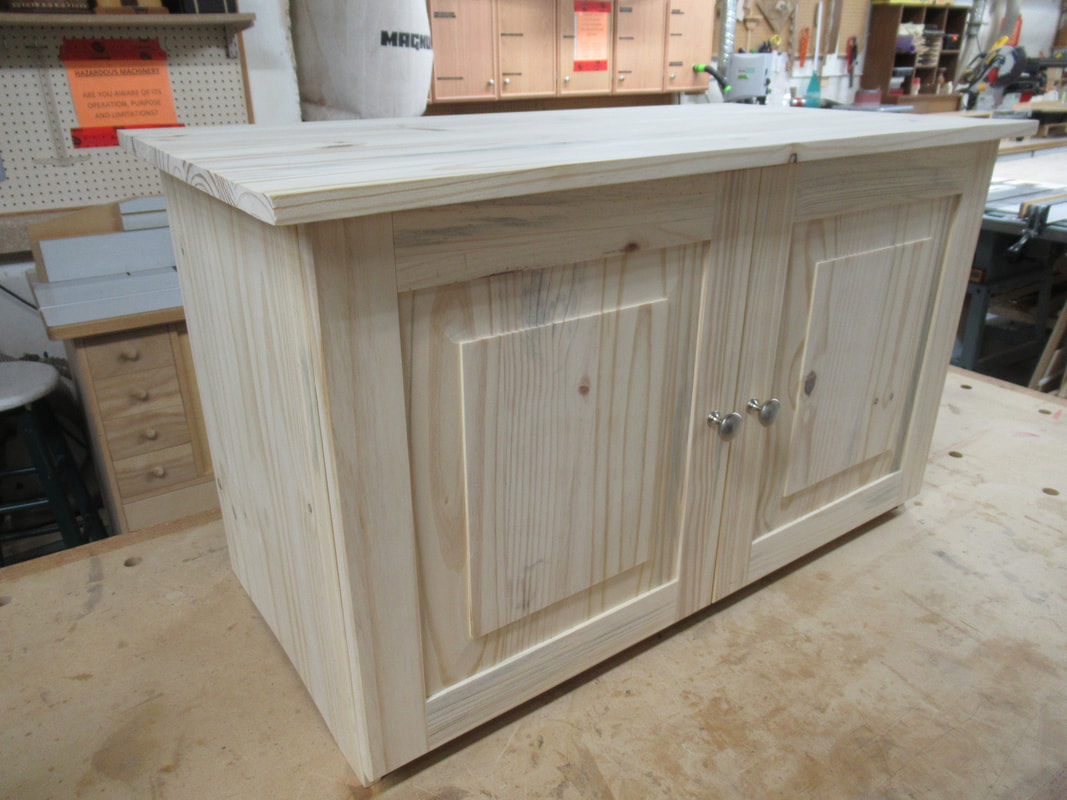
Here is a portable kitchen island that I built for my daughter, to match her existing kitchen cabinets
|
|
|
|
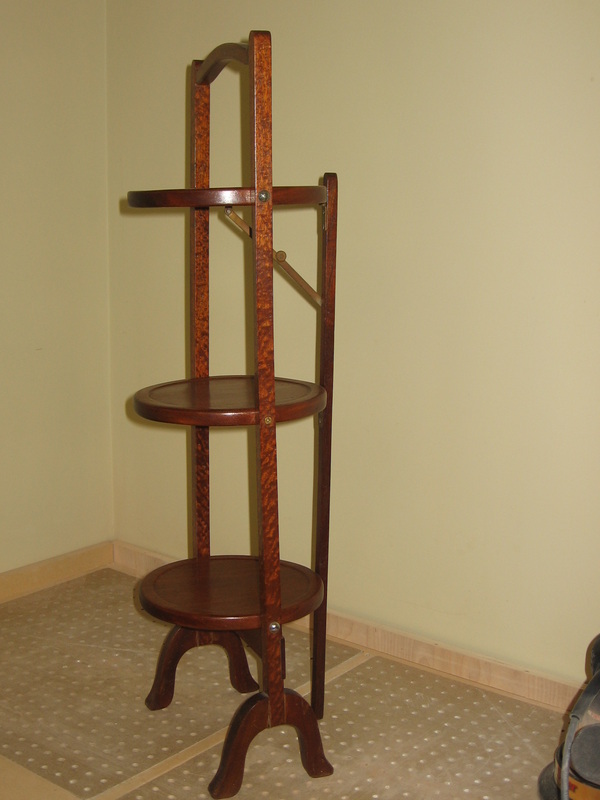
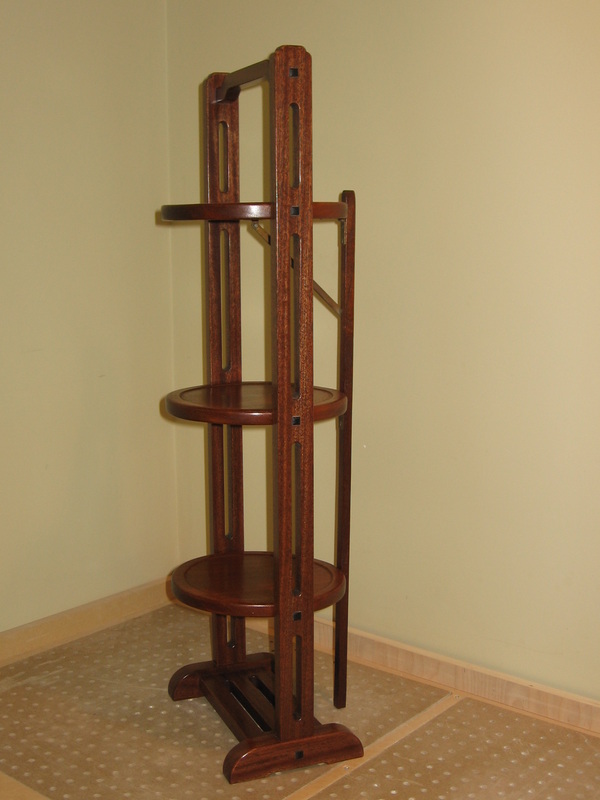
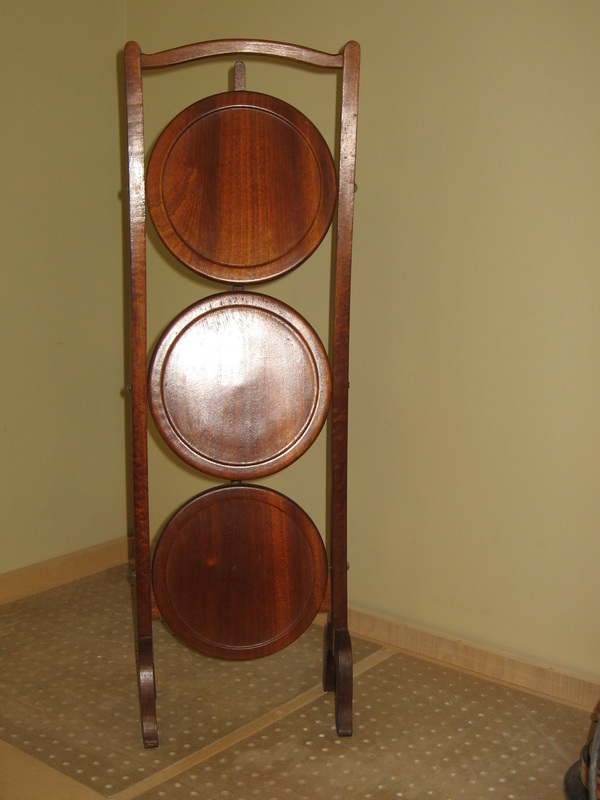
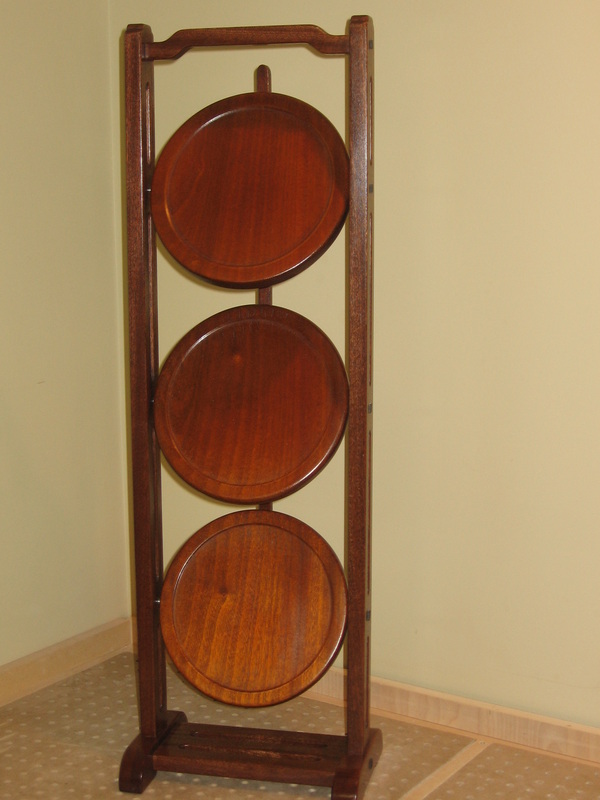
I originally built this cake-stand in high school but it sustained damage transporting it to Canada. I salvaged the circular plates and some of the hardware and re-built it using Greene & Greene design elements. Compare the old one on the left with the new one on the right.
|
|
|
|
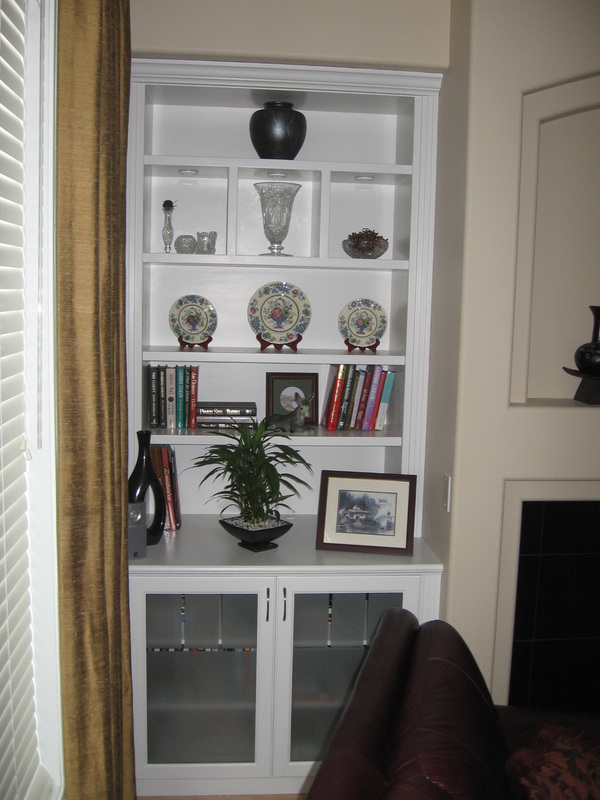
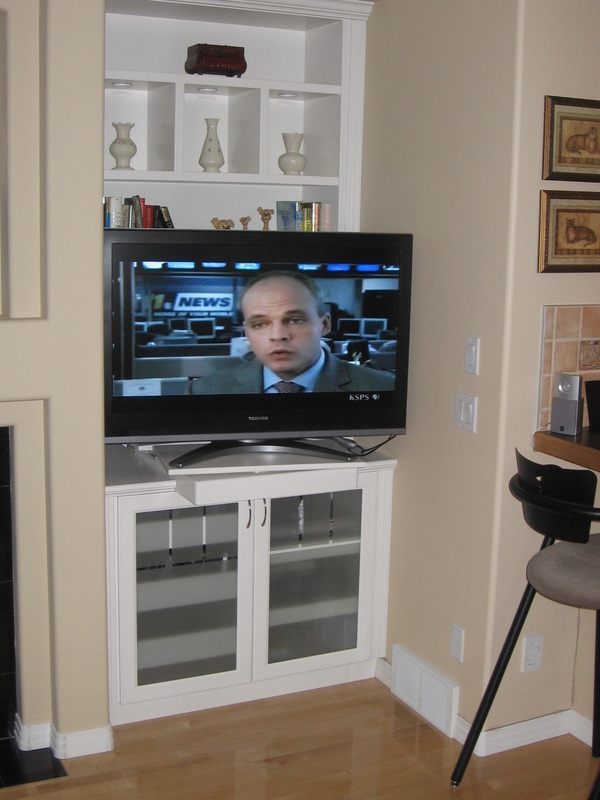
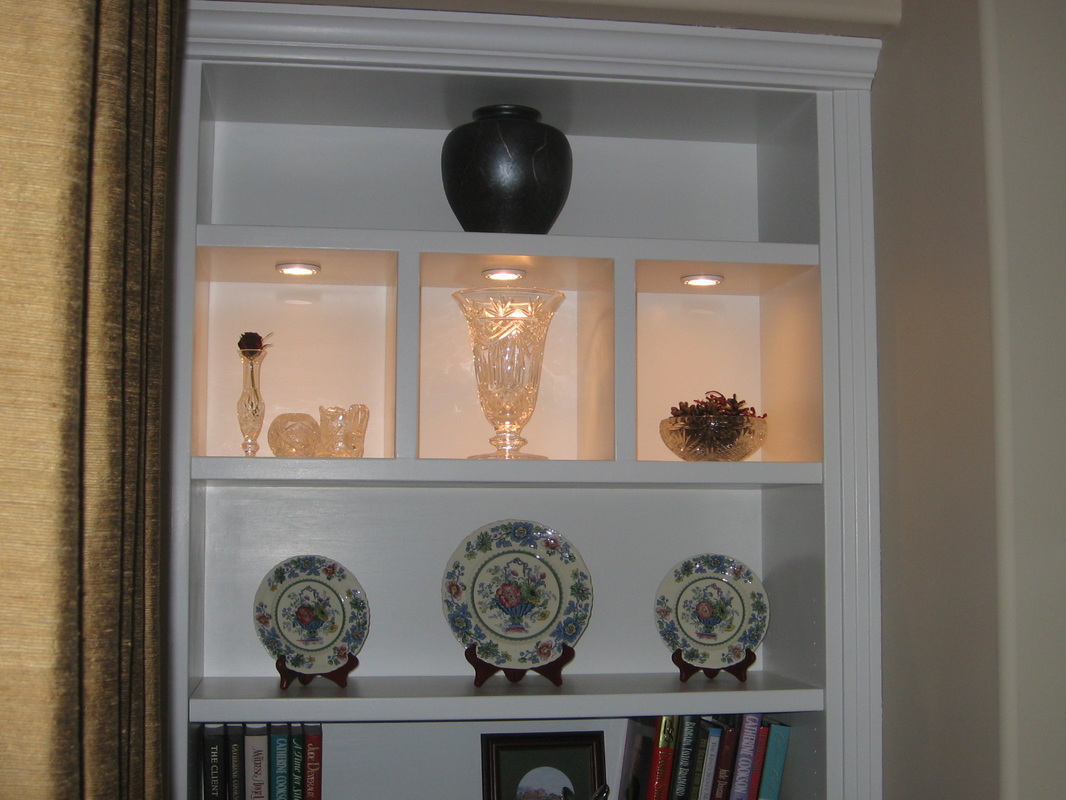
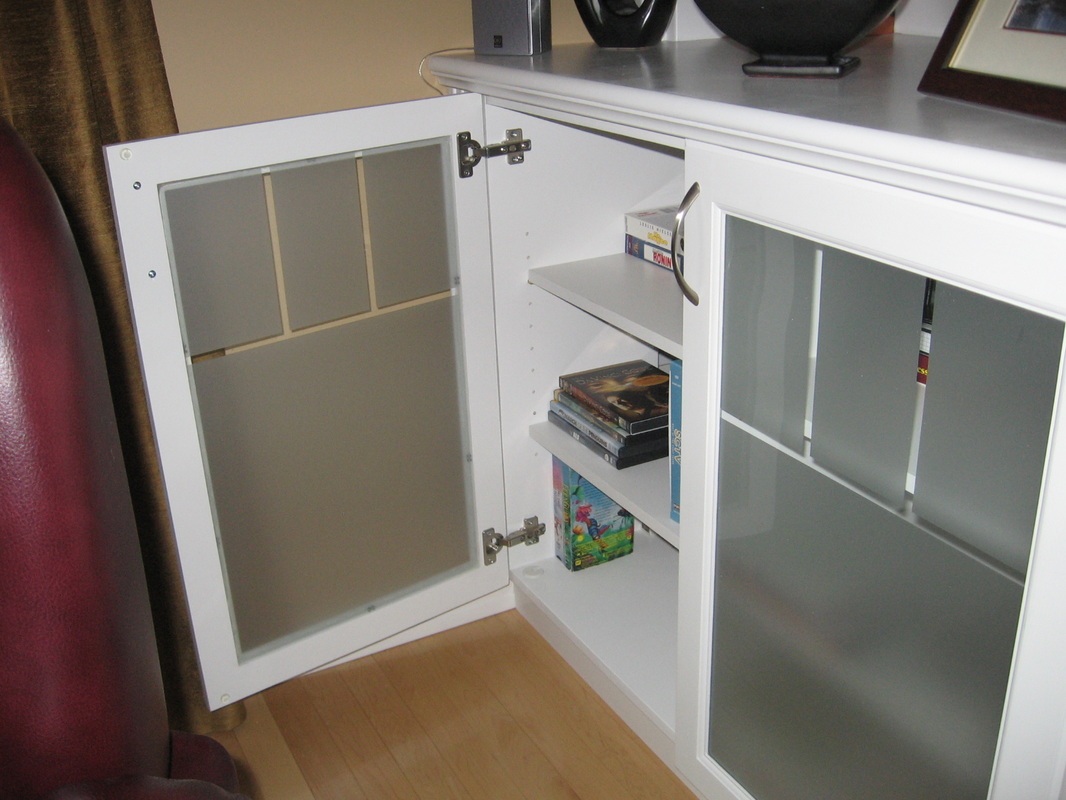
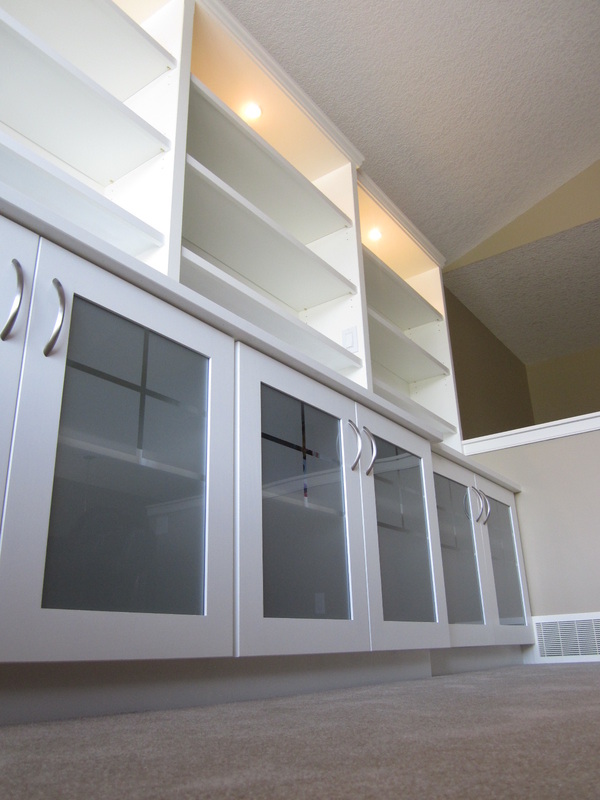
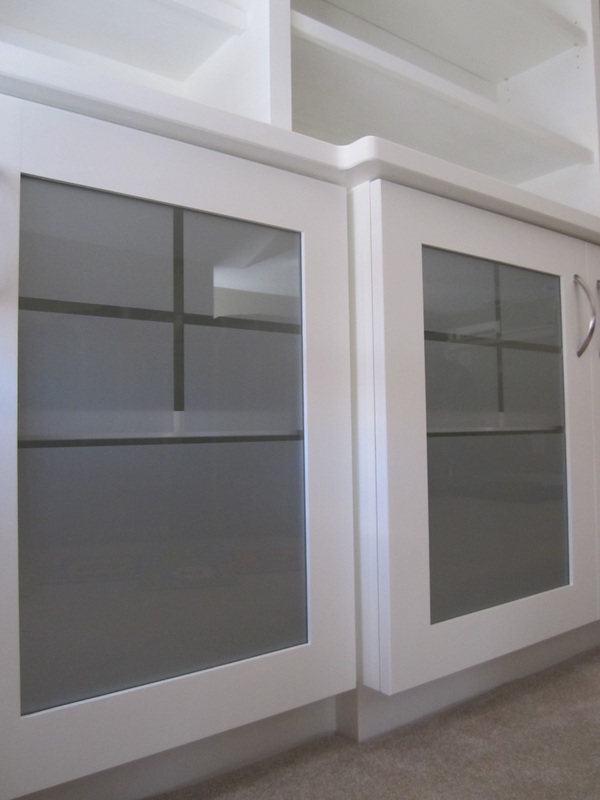
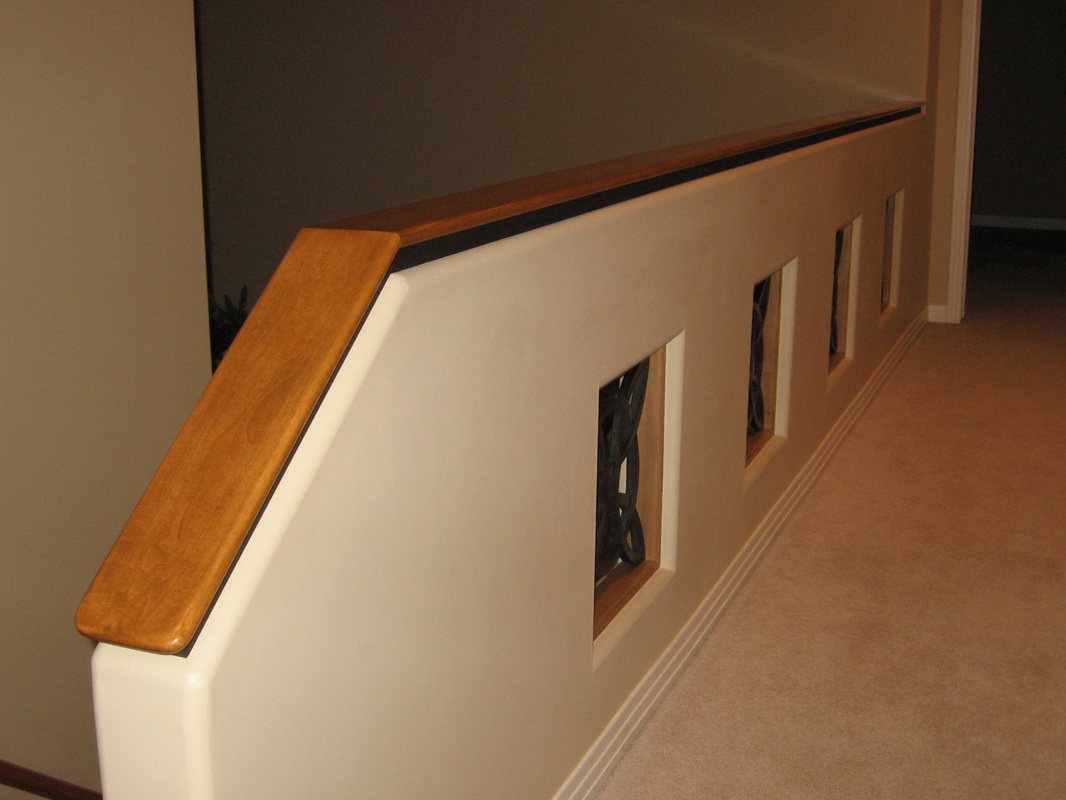
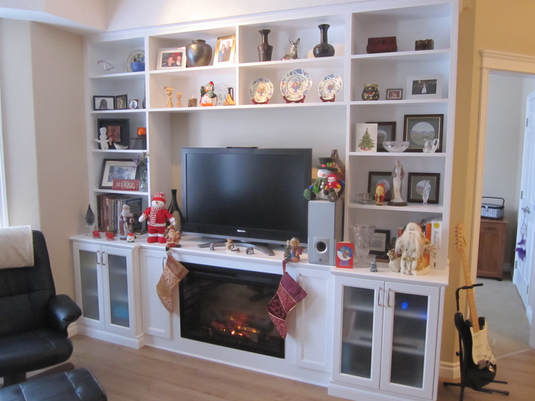
I designed and built these cabinets for each side of my fireplace. They are quite simple boxes really, built from plywood and MDF and painted. The doors are poplar wood, stile & rail construction with tempered glass panels covered with a semi-opaque film. The design is cut with a utility knife and peeled to make the "window mullion" pattern. Low voltage lighting was fitted to illuminate the upper shelves. The right hand one has an extending and swiveling slide to hold a TV and allow it to be viewed from different locations in the living area.
|
|
|
|
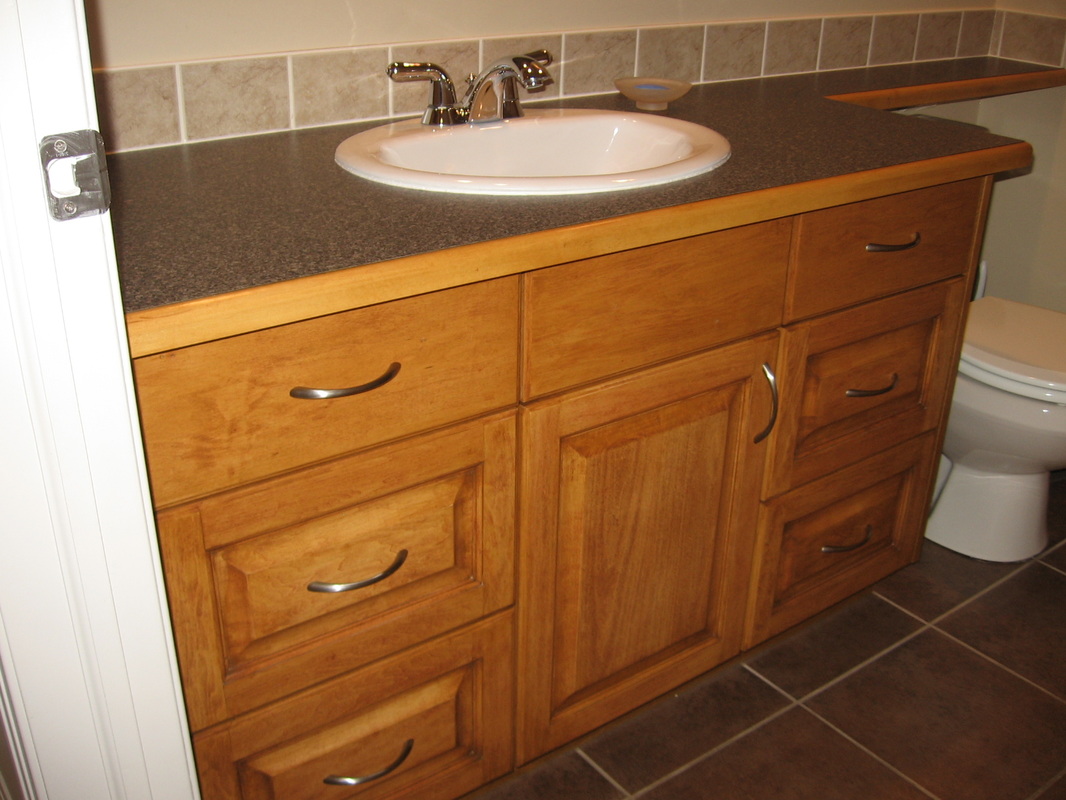
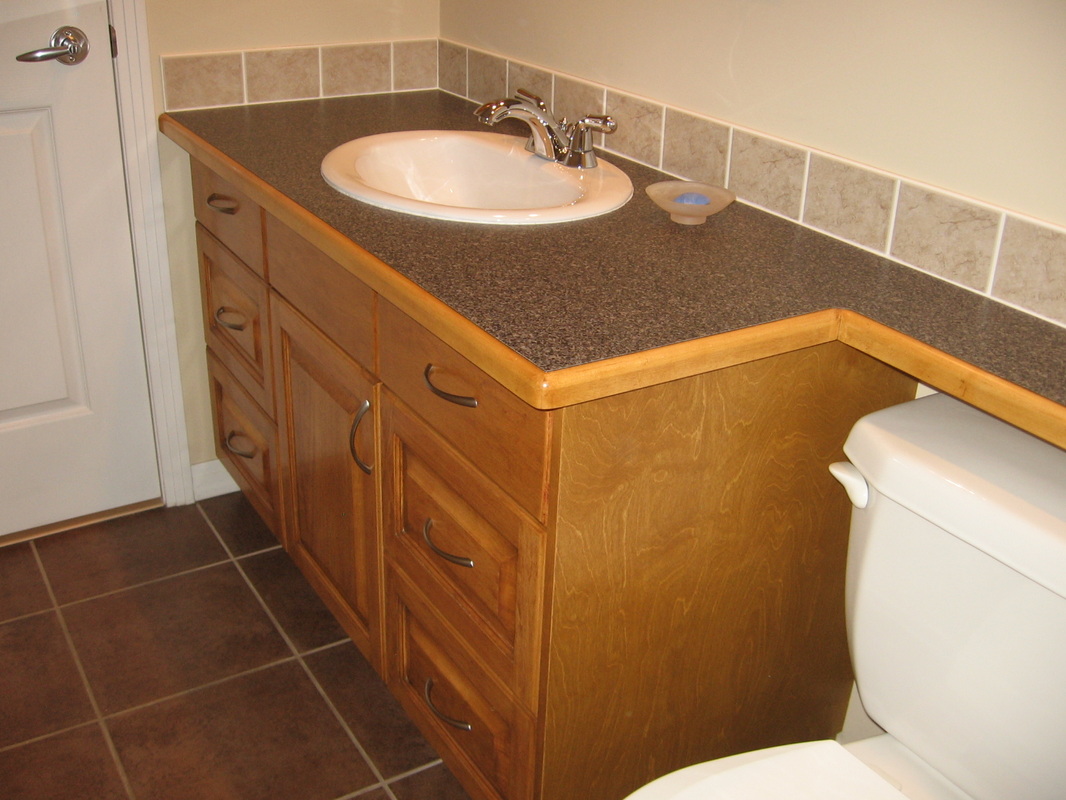
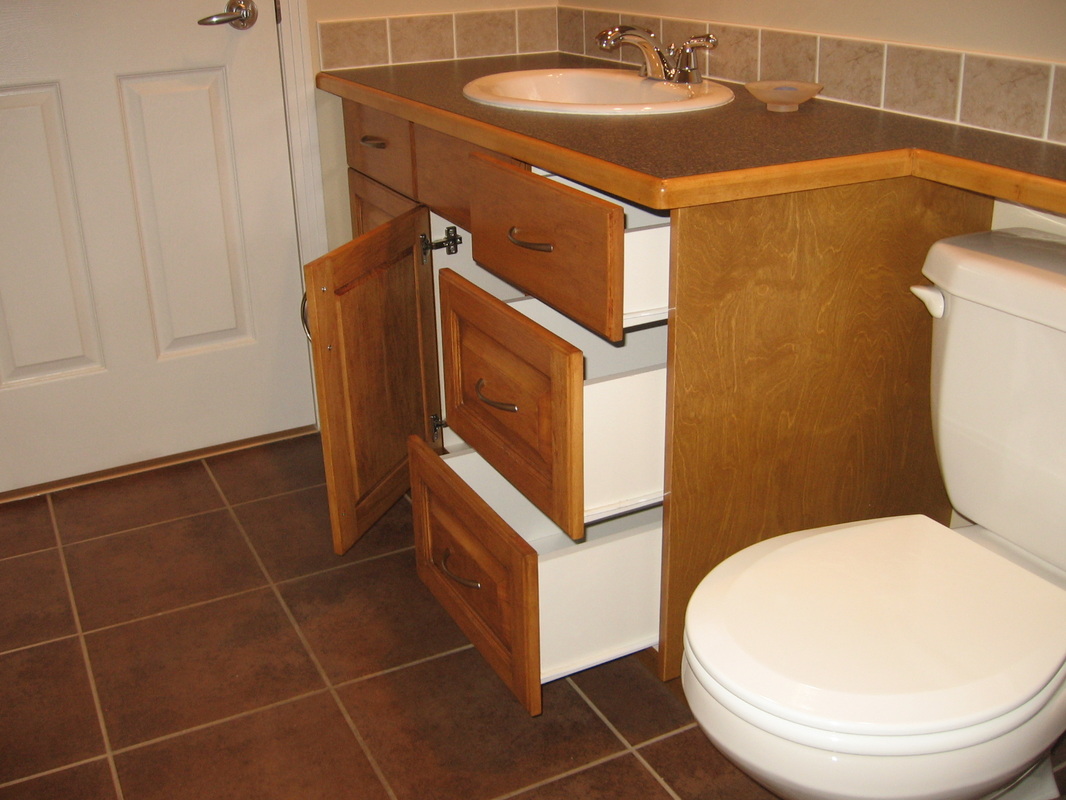
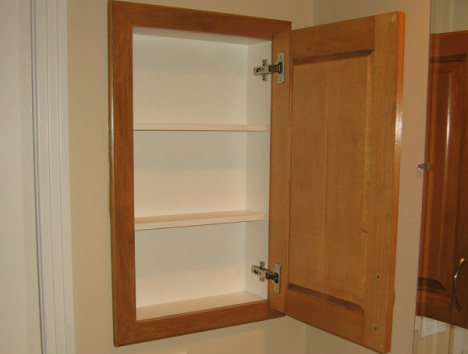
I built this vanity and medicine cabinet for my basement bathroom. It is intended to match the bathrooms on my upper level and comes pretty close. The cabinet carcasses, drawer boxes and shelves are melamine with iron-on edges. Doors and drawer fronts are solid maple and the doors are raised-panel construction.
|
|
|
|
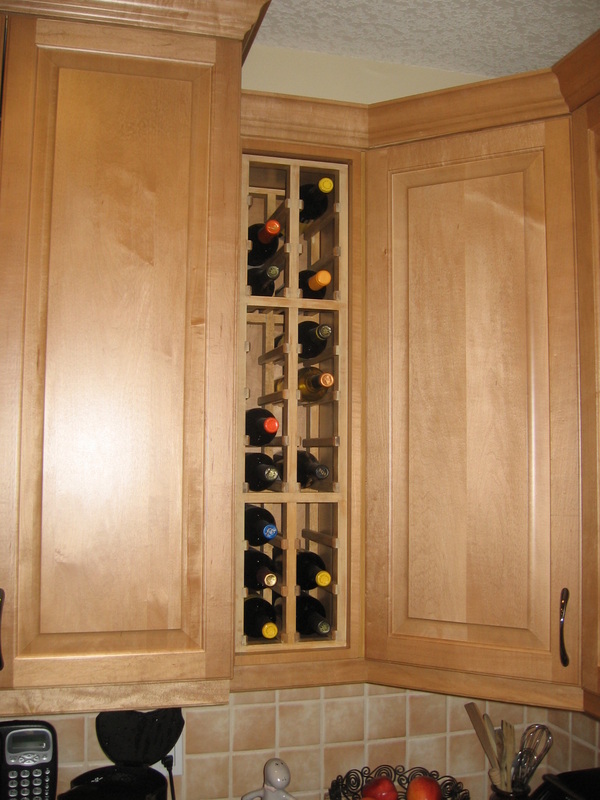
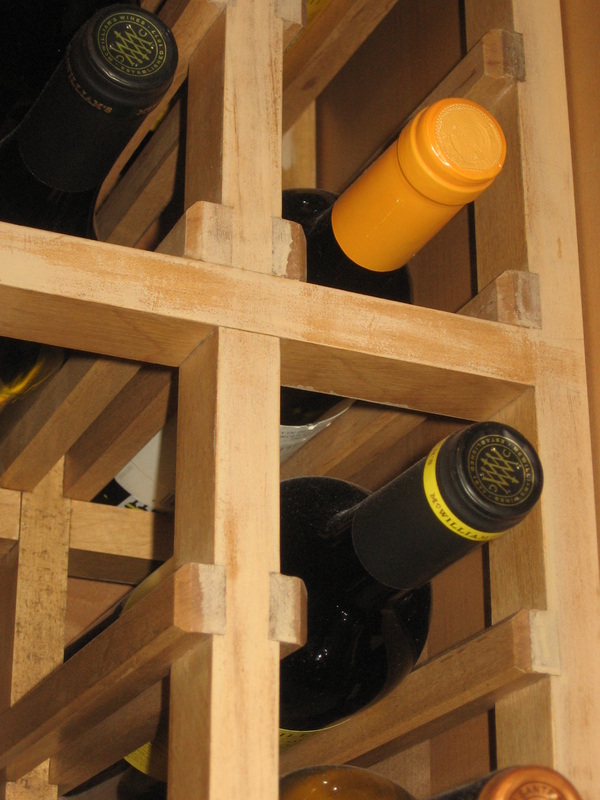
I converted a narrow kitchen cabinet that had three shelves and held 6 wine bottles into this wine rack that holds 20 - much better! Wood is maple and is based on a design I saw in a show-home once. Can you find the dovetail joints?
|
|
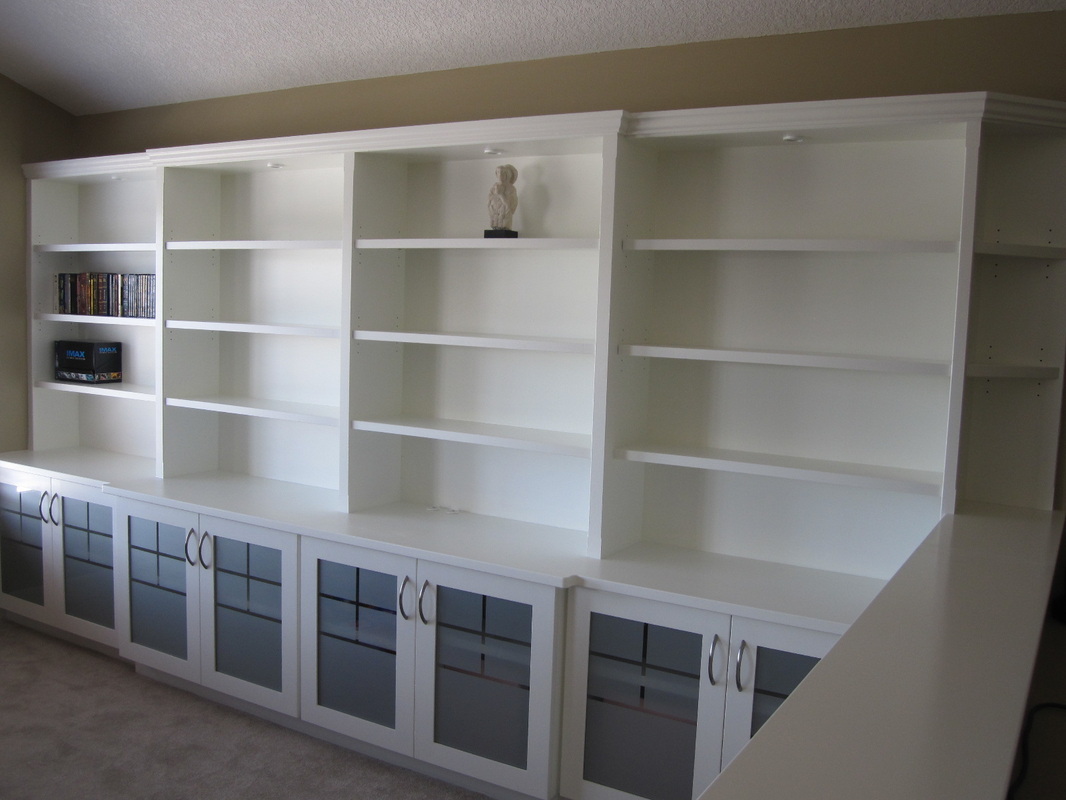
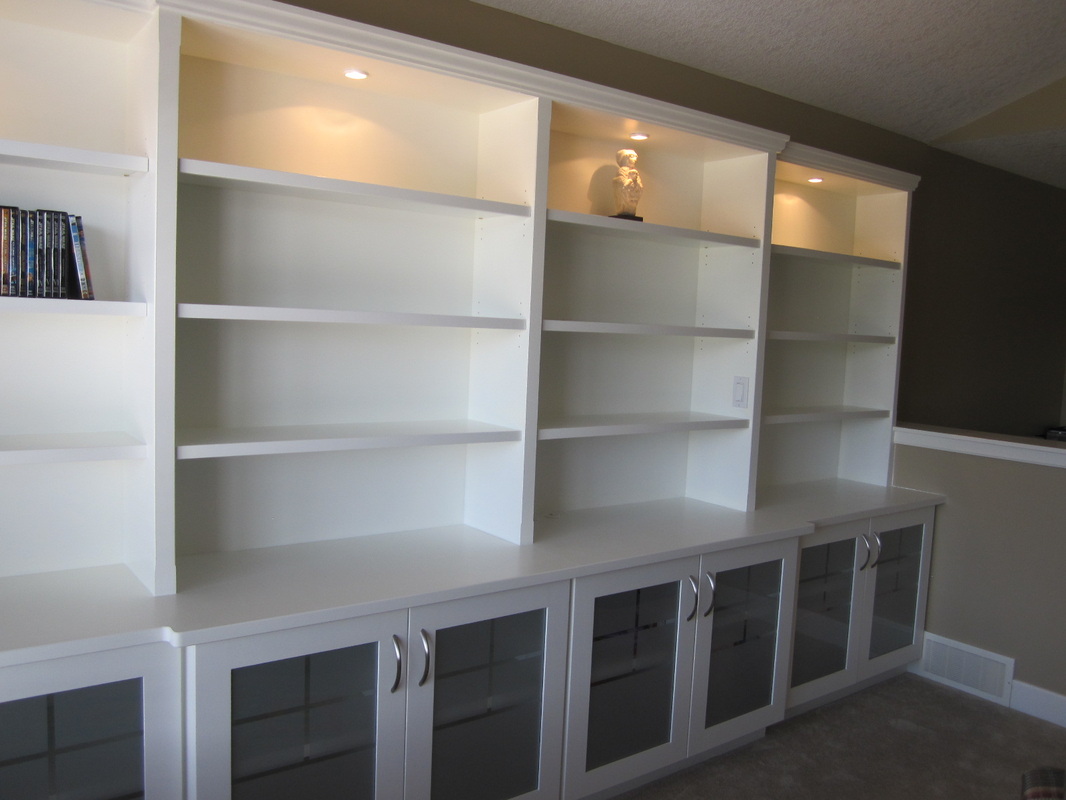
The largest project I have undertaken so far is this wall unit that I built for my son's house. It measures 16'-4" wide and I built it in 8 main sections plus the bases and the little corner piece which I finished after installing the main unit and taking final measurements. It integrates with a shelf on top of an existing pony-wall. Construction is plywood and MDF painted like the ones in my house - shown above. Doors are same construction but slightly different pattern for the window-mullions. Low-voltage lighting was also added for extra effect.
|
|
|
|
Here are some of the smaller projects that I have added to my house.

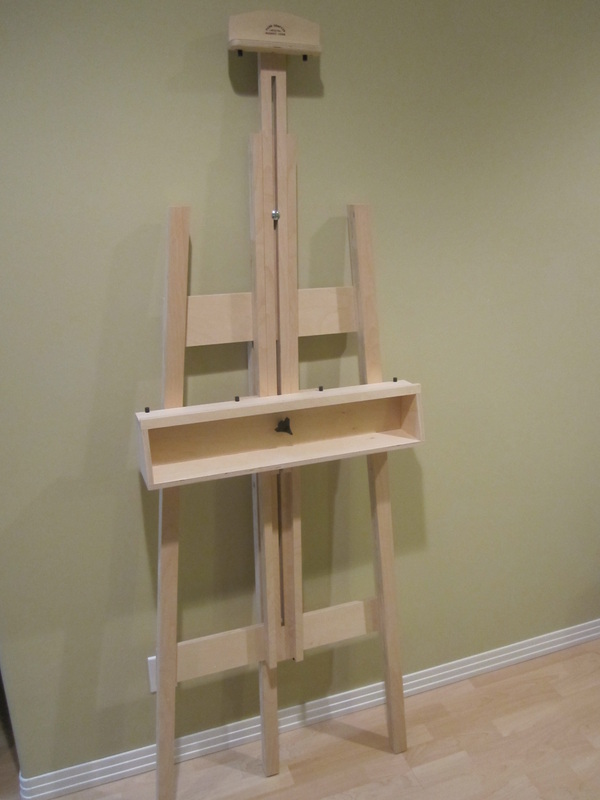
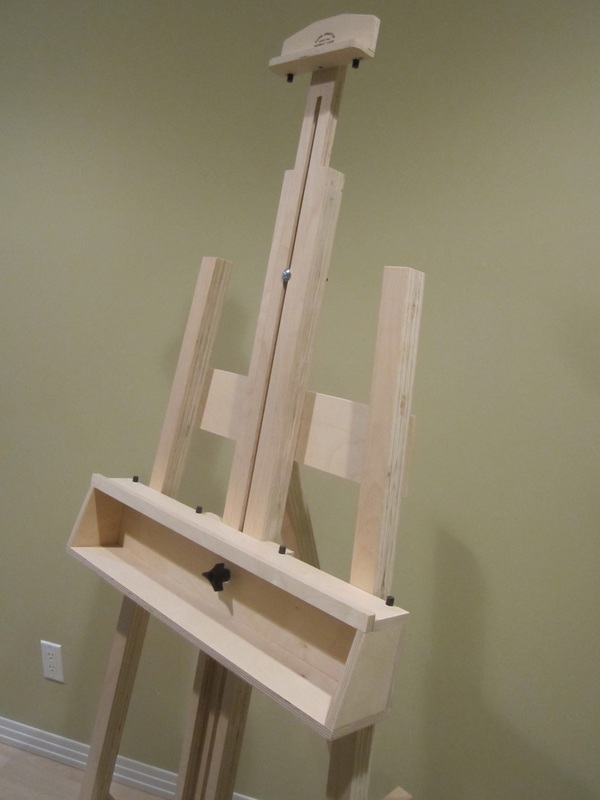
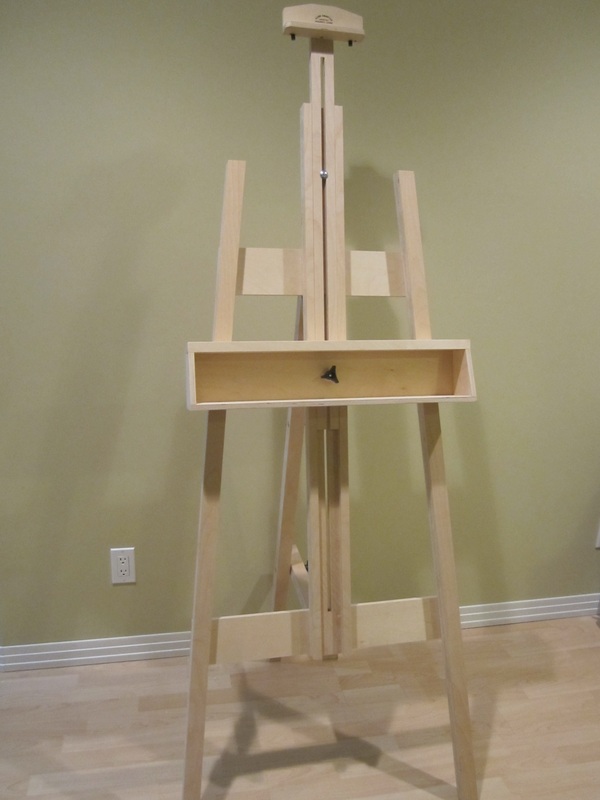
Below is an artist's easel that I built as a gift for my daughter who is taking up painting as a hobby. It is built from plywood, left un-finished and is based on a design from the studio where I take my own art classes. The legs are made up from two layers of plywood glued together, approximately 1-1/2" square.
|
|
|

|
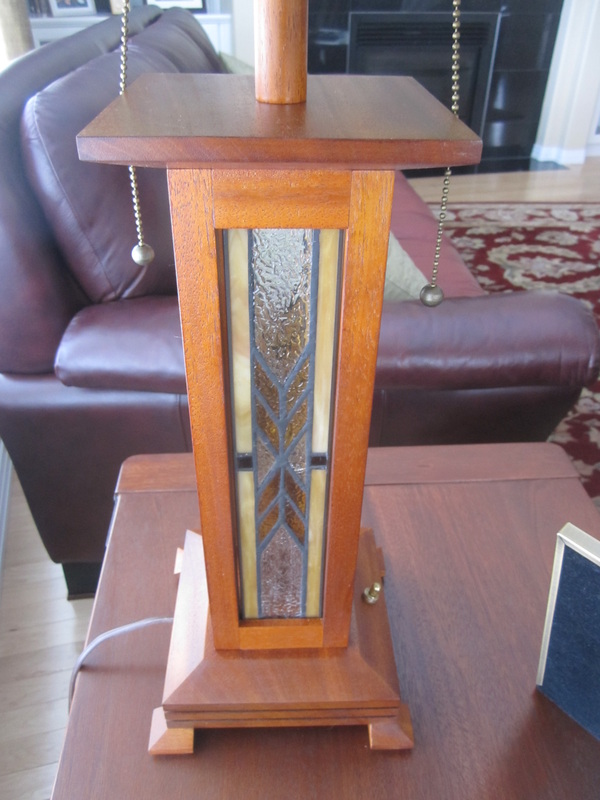
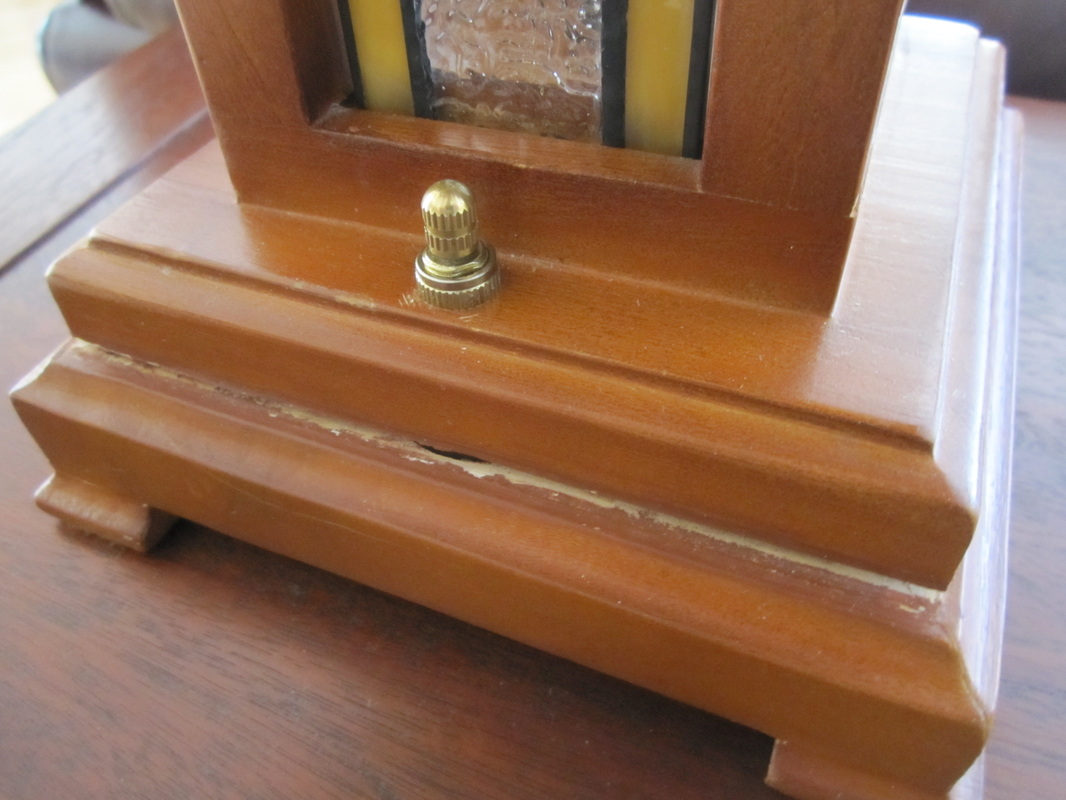
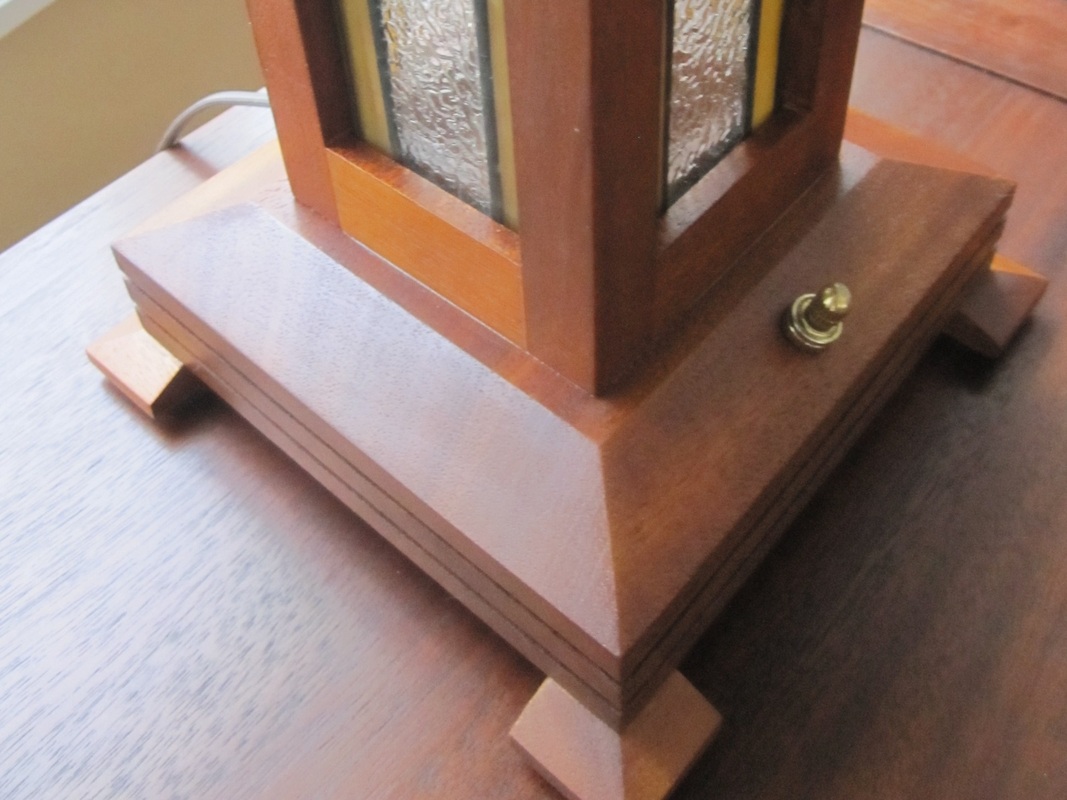
The table lamps in our living room had nice stained and leaded glass shades and panels but the wooden pieces (made in China) had shrunk and twisted in the dry Alberta climate. I removed all the glass, metal components and wiring and re-made the wooden portions in a Craftsman style using mahogany left-overs from the bedroom suite project. I stained them with aniline dye and finished them with wipe-on polyurethane. Photos of the originals (left) and the re-built ones (right) are shown below.

|
|
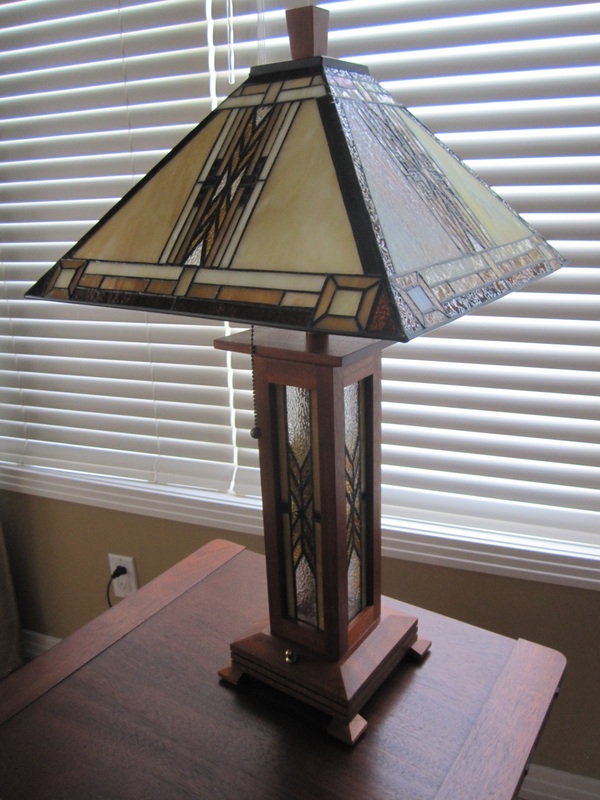
One of the re-built lamps with the shade installed.

I built a sauna in our basement. For details of construction and finishing, please go to my "Sauna" page.
I built this wall unit complete with electric fireplace for the apartment we moved into in 2017. It is 9'-0" wide x 8" 0" high. It replaces a corner fireplace with a single mantle/shelf so provides much needed additional storage. It is also sized to accept up to a 60" flat-screen TV.
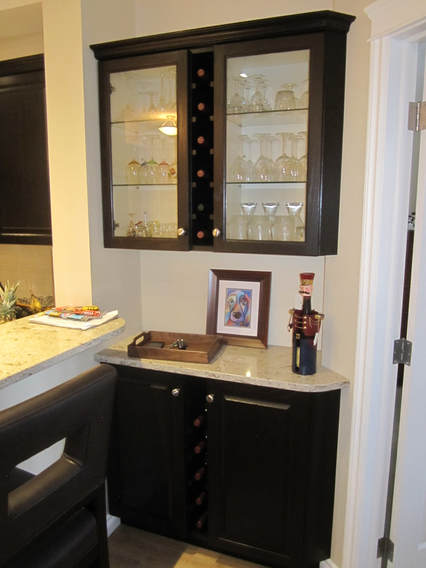
These upper and lower cabinets each have a central wine rack that holds 6 bottles and provides lots of additional storage for our kitchen and a great place for our coffee station. I built these to match the existing kitchen cabinets in our apartment and added a quartz counter-top to match as well.
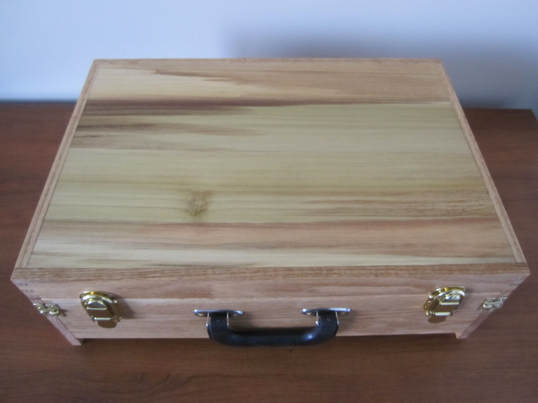
I built this Artist's Pochade Box to use for my painting supplies. It is designed to be a grab-and-go means to carry my paints, brushes and palette but is also equipped with a small easel and a means to hold and transport masonite or canvas covered painting panels up to 16" x 12". More photos and details are available on my "Pochade Box" page. I used re-cycled or salvaged materials extensively, except for the hardware.
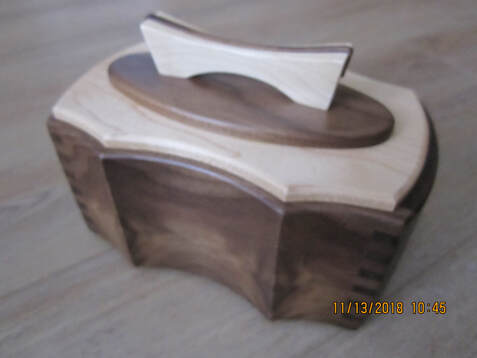
I make a selection of small keepsake boxes for the ladies in my family or for gifts or display. More photos and details are available on my "Small boxes" page.
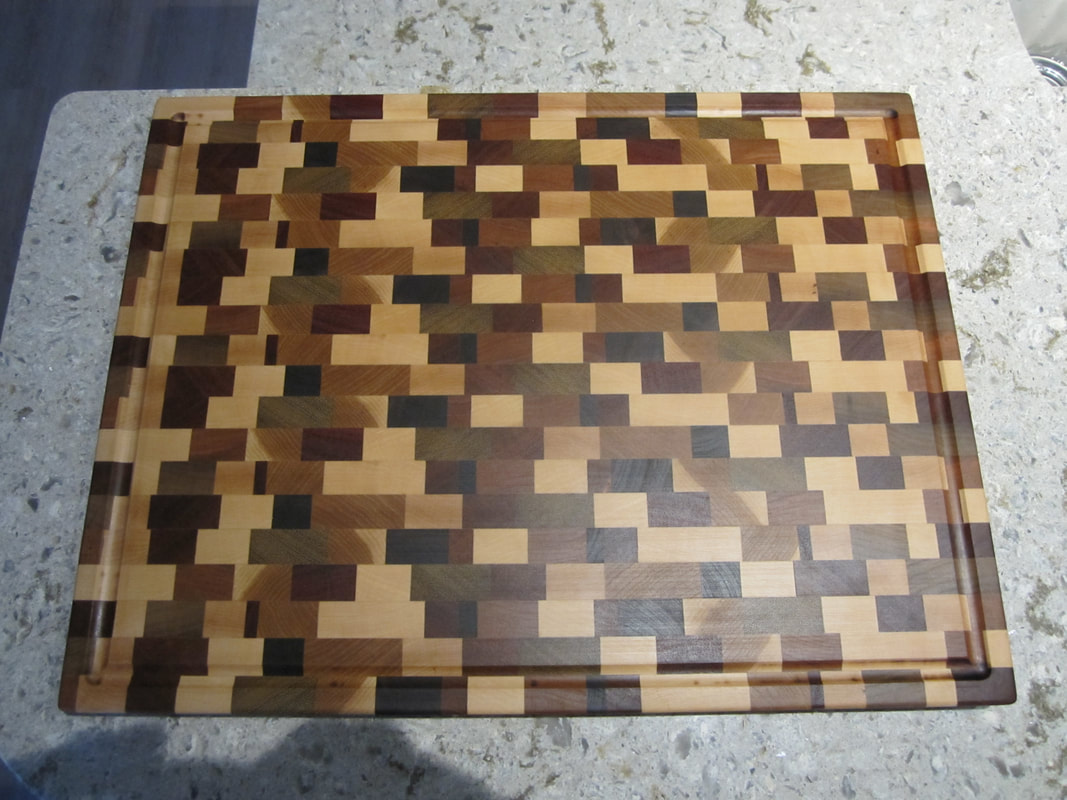
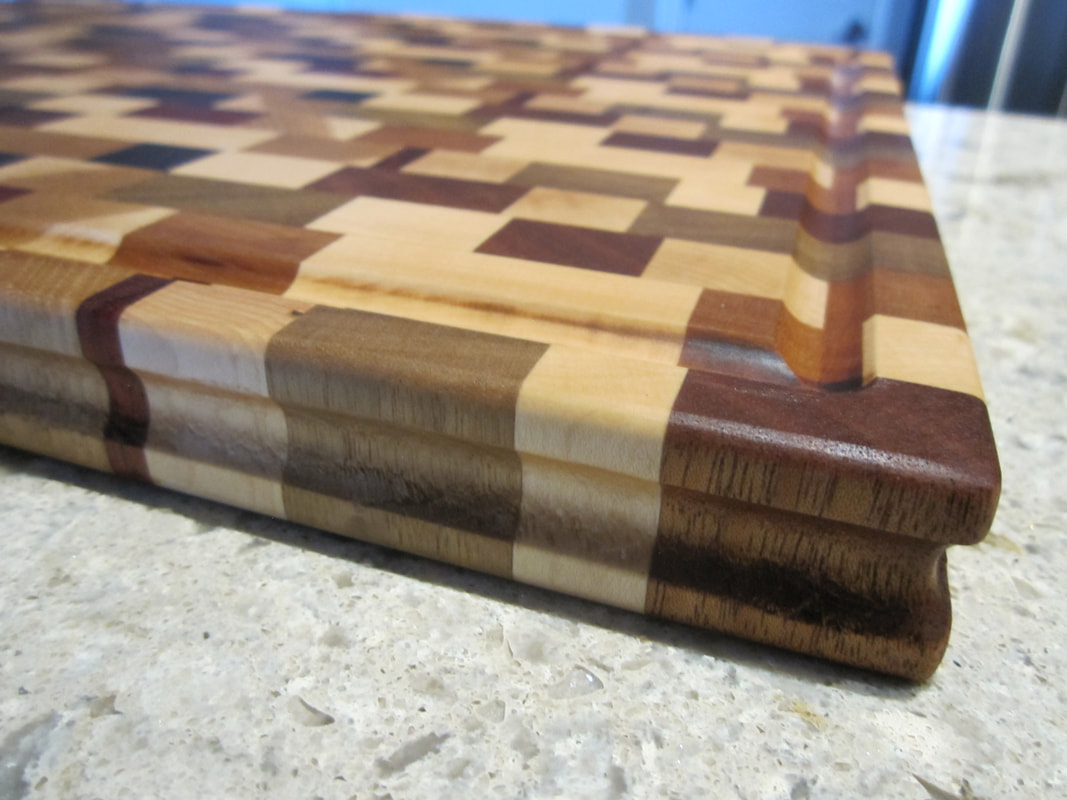
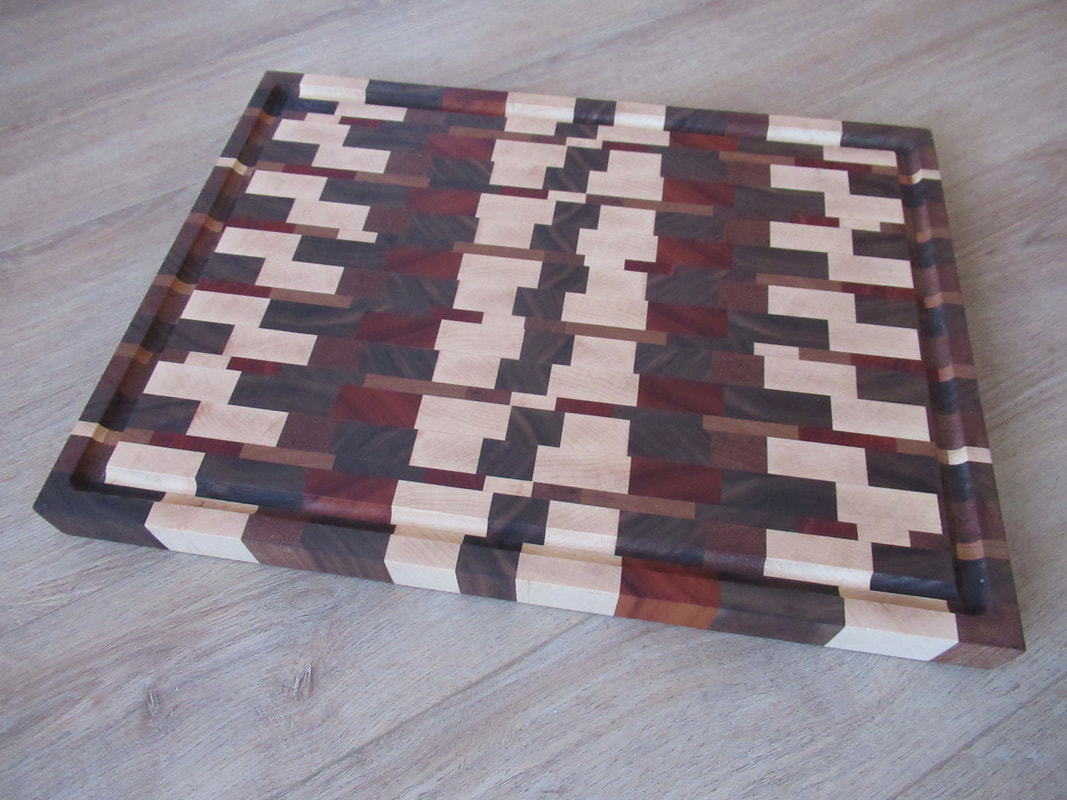
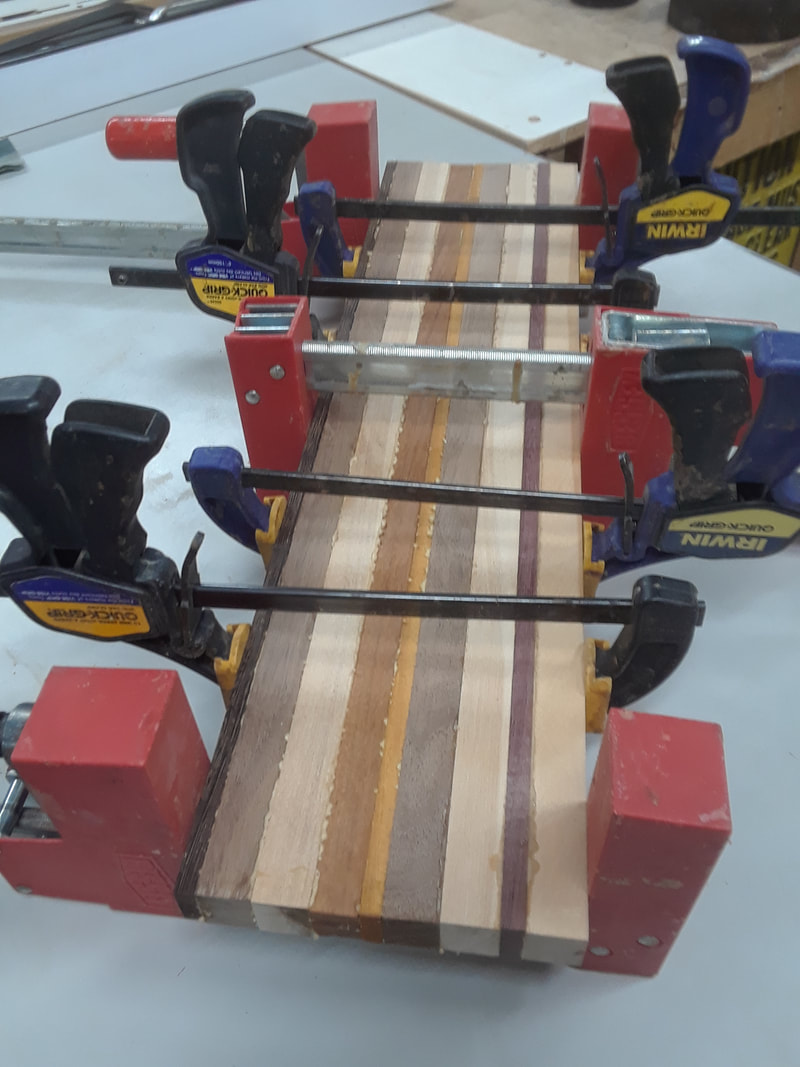
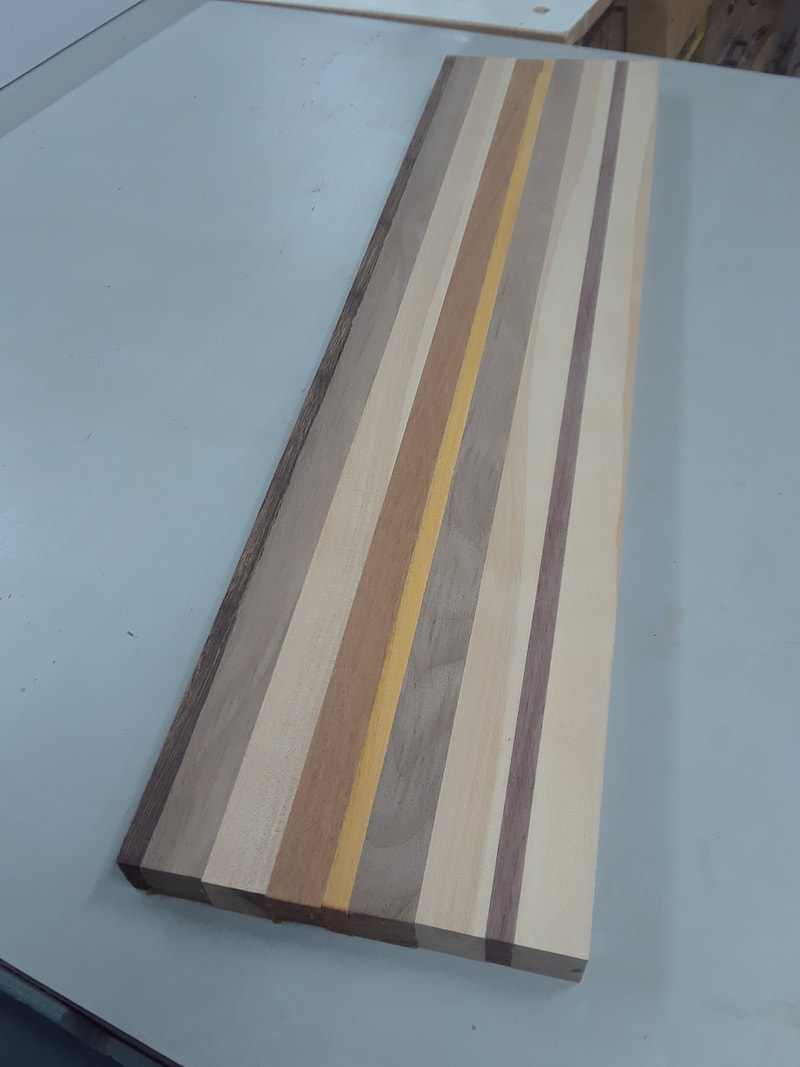
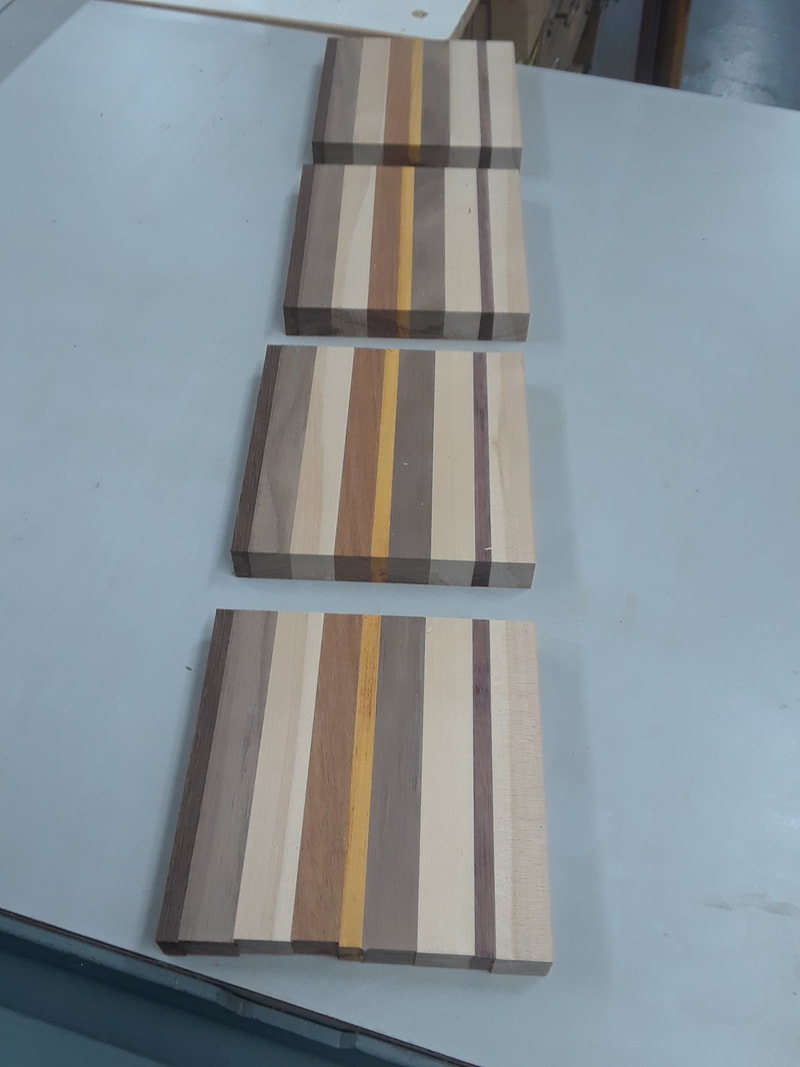
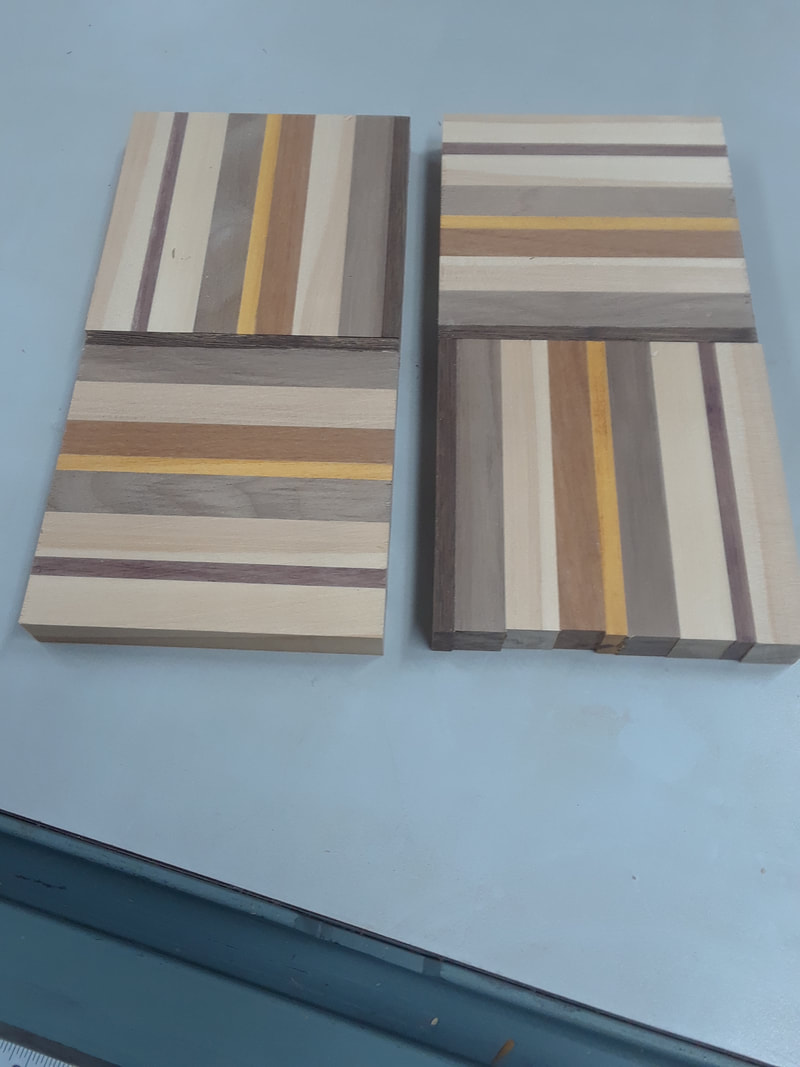
I made this end-grain cutting board from short pieces and off-cuts of various hardwoods in strips of different widths, planed to uniform thickness and glued into two "blanks" slightly larger than the finished cutting board. Then the blanks were cross-cut into strips the thickness of the cutting board and alternated and oriented to give a pleasing appearance before being glued together into a single piece. After rough sanding I routed a channel with a core-box bit all around both faces to collect liquids and around the edges for decoration and to assist with picking it up. I applied a food-safe mineral oil as a finish to protect the wood and enhance the appearance.
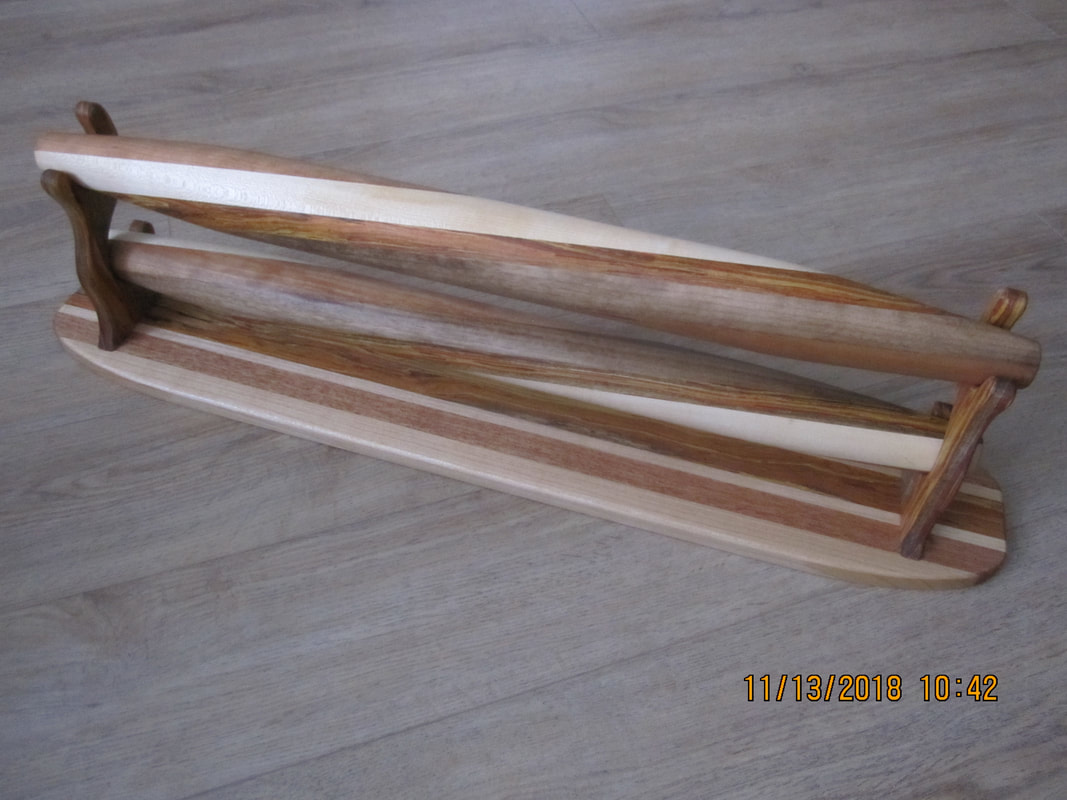
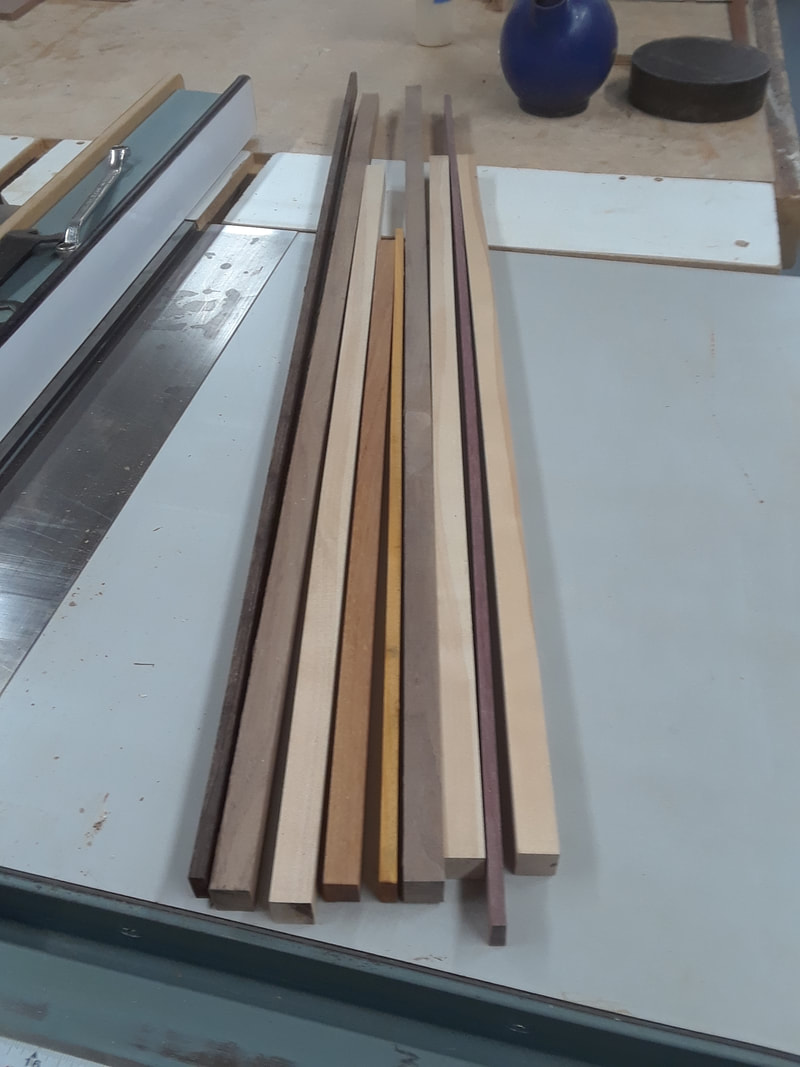
I made these pastry rolling pins by gluing up a 2" wide blank using a series of different hardwoods and synthetic material and then cutting it on the bias to create roughly square turning blanks for the lathe. After turning into cylinders and tapering the ends on the lathe they appear to be twisted when viewed in a certain way. The really colourful material is salvaged from some kind of synthetic product used for engineered flooring but looks really nice when included with the cherry, maple and walnut hardwoods. "Too nice to use" I'm told, so I made a display stand for them.

Since acquiring a "new" lathe in the workshop, I am enjoying doing some turnings of items such as bowls, vases and ornaments. More photos and details are available on my "Turnings" page.
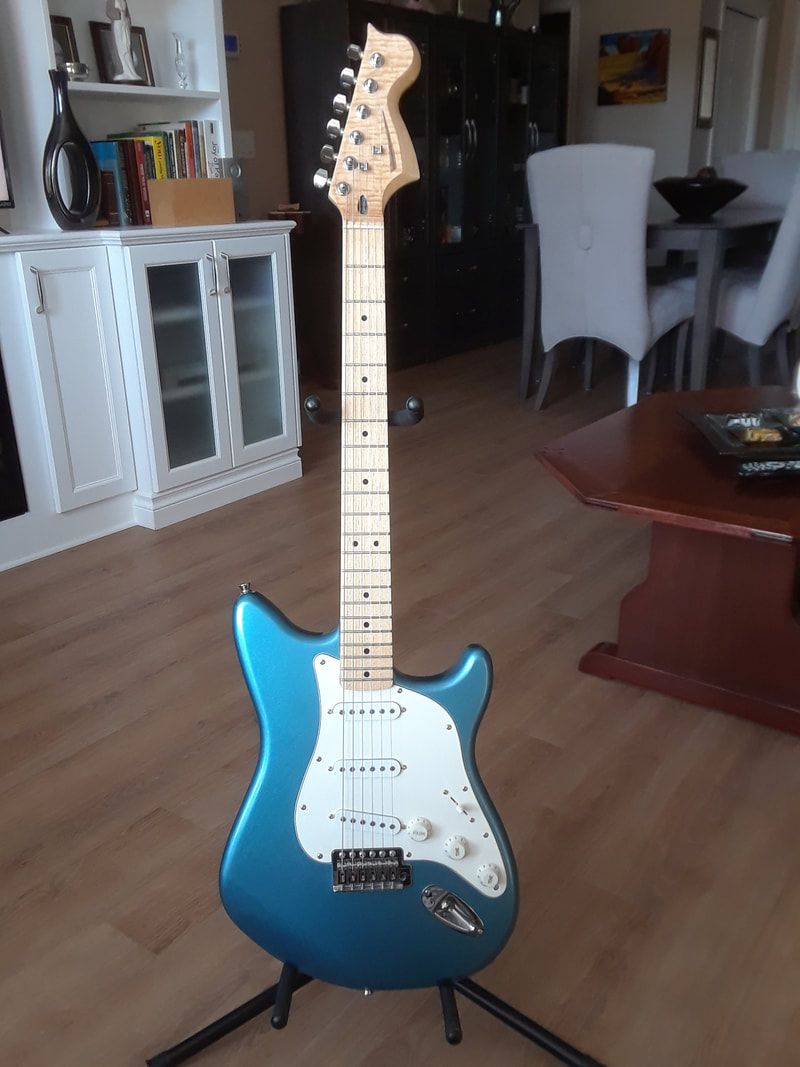
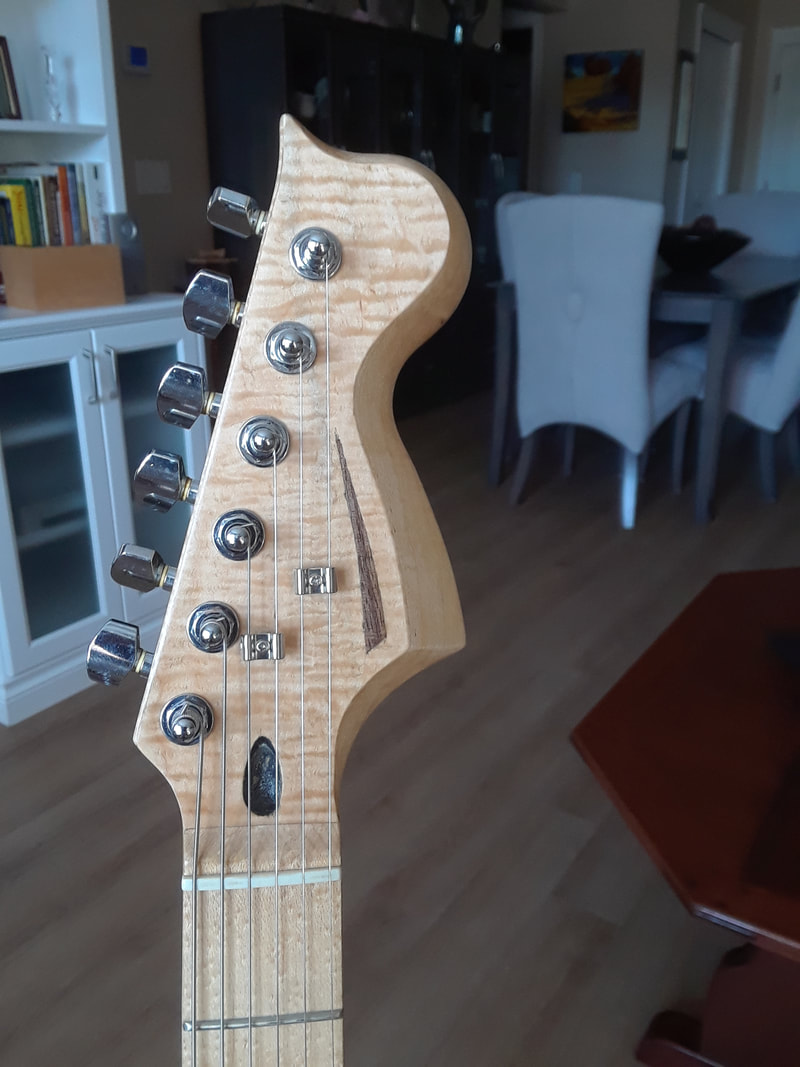
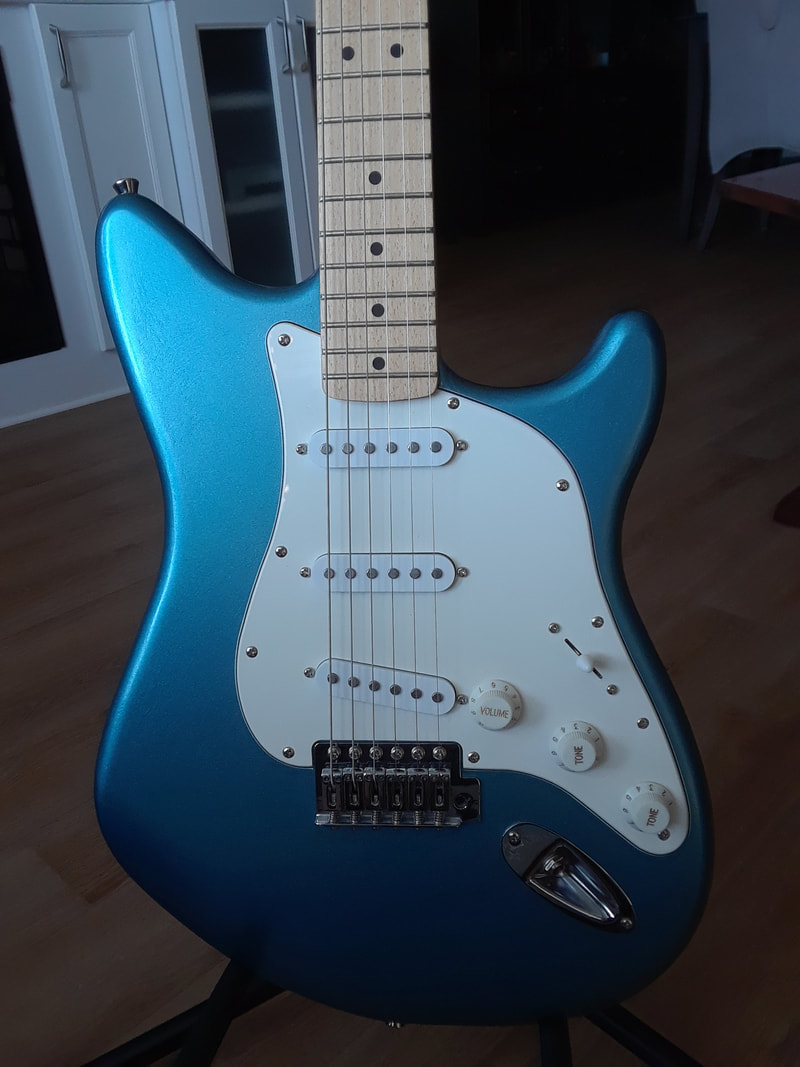
I had this cheap Fender Starcaster guitar which was painted black and had some issues with fretboard shrinkage and protruding frets, a result of our dry climate. I decided to re-work it and put a little of my own ideas into it. I reshaped the headstock, carving a tapered section that blends with the outline of the original shape. I added a small up-turn at the end, covered the face and edge with a quilted maple veneer and added a walnut flash to the face. I reshaped the body cutting back both the horns above and below the fretboard and I re-shaped the pick-guard. Finally I repainted the body using automotive paint and clearcoat in a bright metallic blue shade. I am quite pleased with the result and it gave me enough confidence to build a guitar from scratch as shown in my Guitar page and briefly featured below.
|
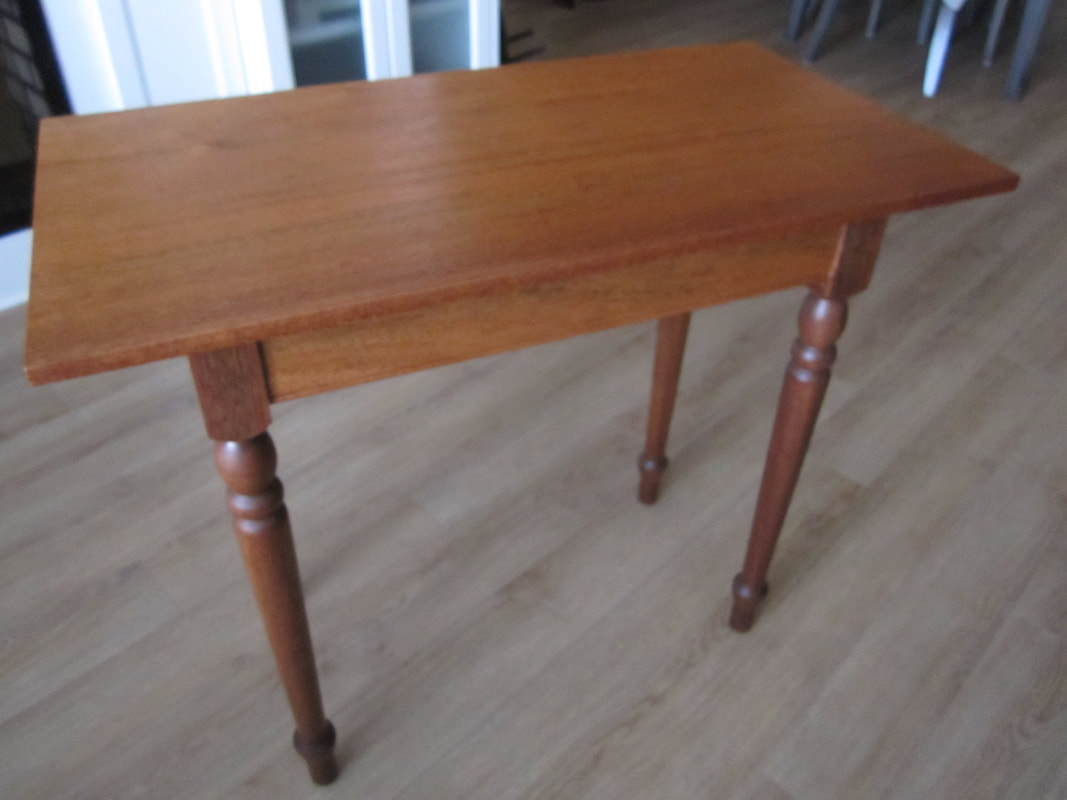
This little Mahogany side table was built using four salvaged stair rails that I modified on the lathe. I added the aprons using mortice and tenon joinery and the mahogany top was glued up from two wide boards. It is being used in our apartment as a display table for some of my small boxes and turnings. |
|
|
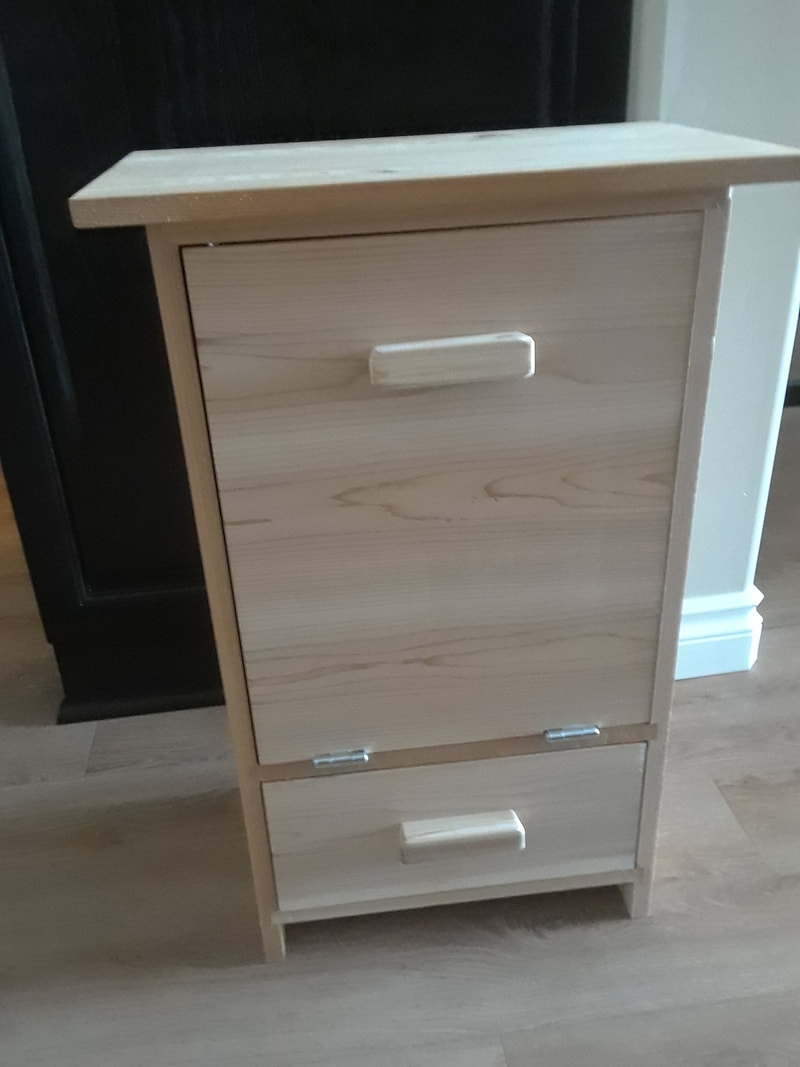
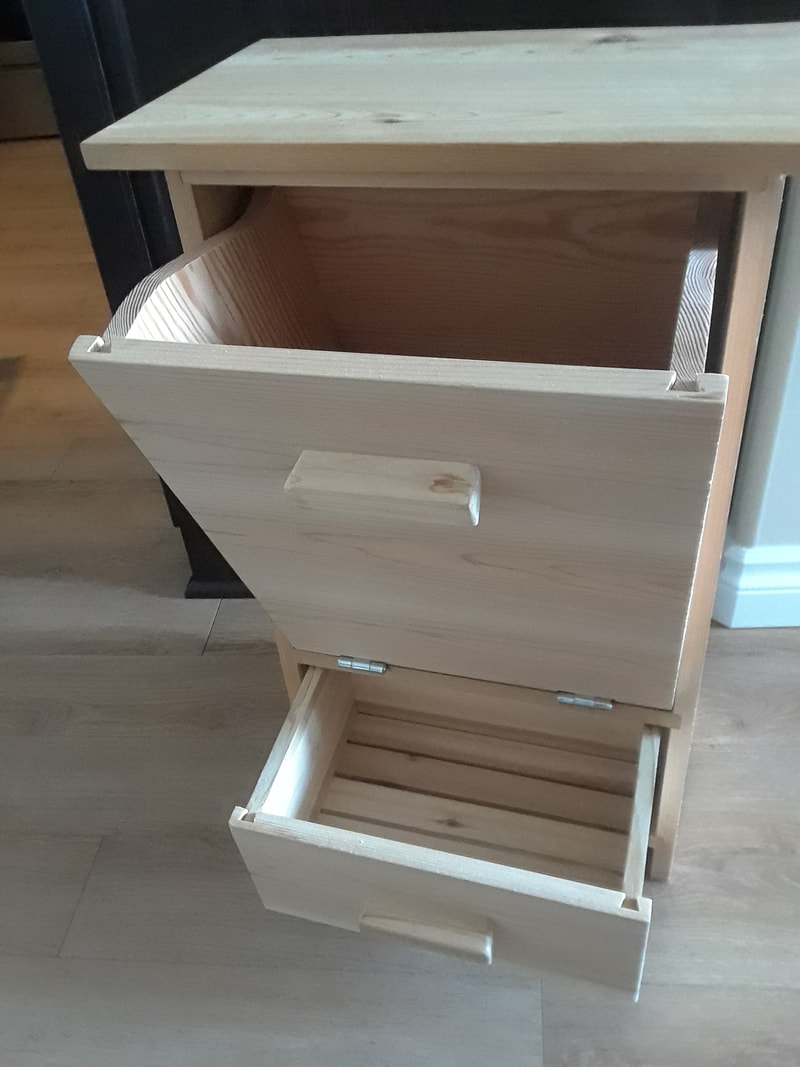
I made this little cabinet for a good friend who wanted something this specific size for a location in his house. It is made from wide shelving material that comes in 15 1/4 inches wide x 8 feet long. I glued some pieces on to make up the 18 inch wide top and the back. I left it un-finished as my friend plans to paint it. |
|
Another end-grain cutting board made from a selection of hardwoods and finisher with walnut oil. I gave it to a friend for his birthday gift. |
|
|
|
This storage box was made from selected cedar fence boards and we use it on our pantry for potatoes and onions. It is sized so tht the top is level with onme of the shelves which adds much needed storage in a small apartment. |
|
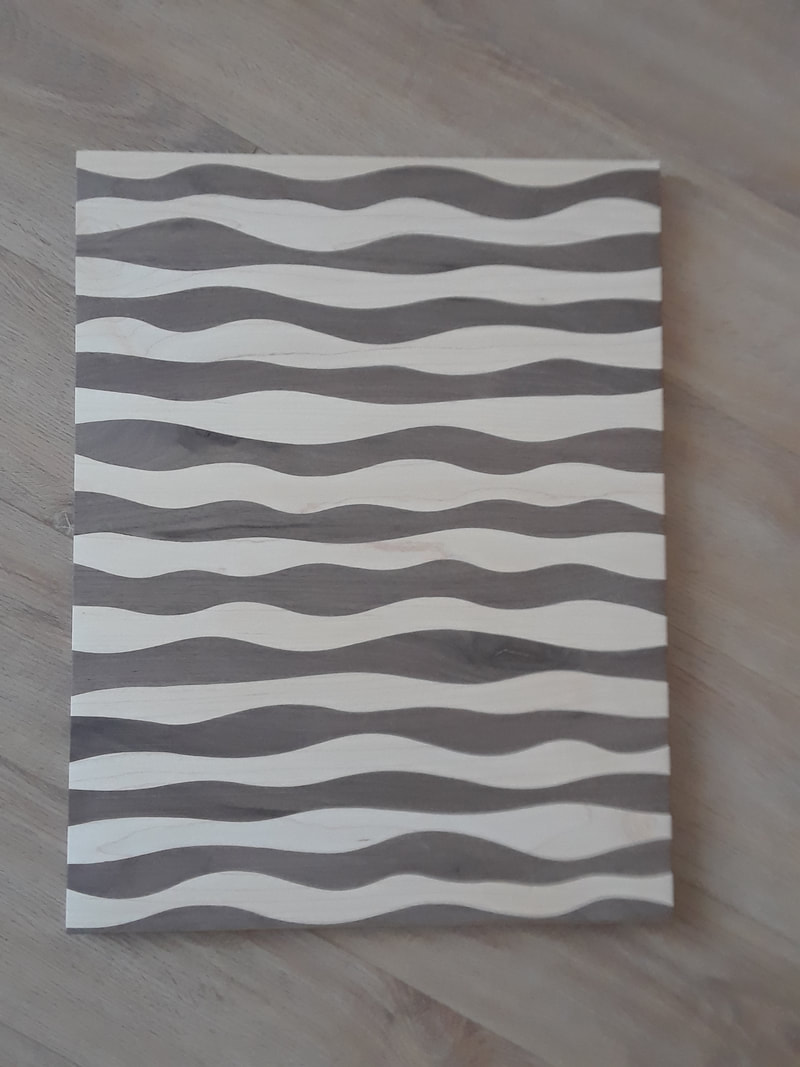
This unusual cutting board is made by laying two boards of different colour on top of one another and cutting curved strips on the bandsaw. Then the pieces of light and dark woods exactly match each other and can be glued together to form this unusual pattern. The final cut in the centre is done on only one board and then marked on the other, cut and sanded to fit. You might notice that the curves are smoother and easier to match for that last joint. As a point of further explanation, if you look very carefully you will notice that the top light strip (maple) is a reverse match for the bottom dark strip (black walnut) and this system repeats all the way to the centre. It is hard to spot this because the pattern is rotated 180 degrees and a different colour. I call it the Zebra cutting board but it is purely a decoration and discussion topic. |
|
|
|
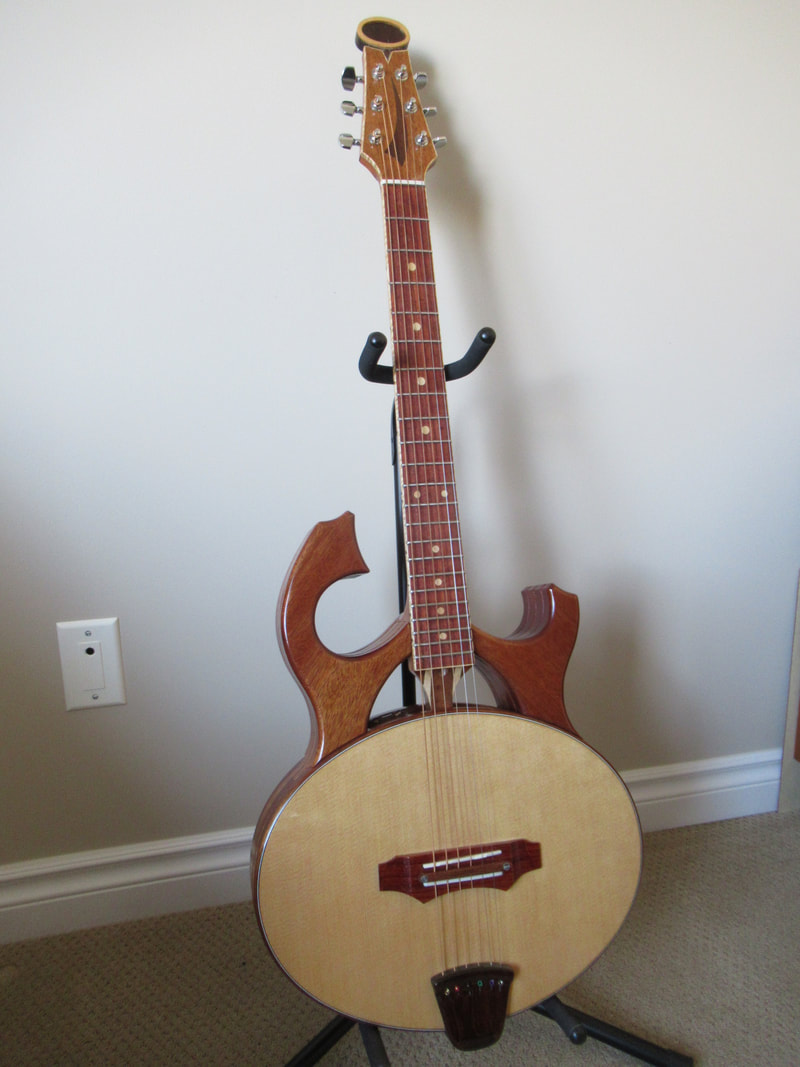
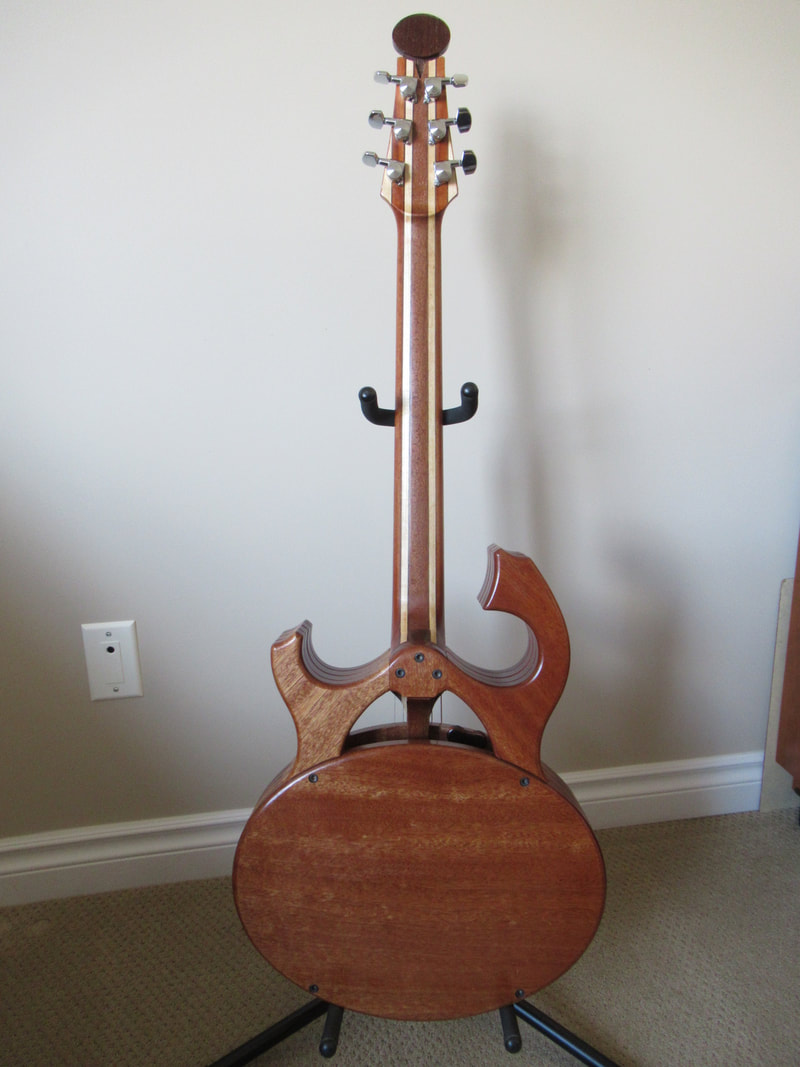
This "Ovalution Guitar" was one of my most interesting projects, built alone during one of our Covid-19 shutdowns. I have created a separate page for this Guitar under my Woodworking tab and you can find lots of information there. |

|
|
|
I built this Hall Bench in the Greene & Greene style using Sapele (African Mahogany). I added interlocking dividers so I can store shoes vertically which makes them easier to remove. The bench provides a great place to sit while tying your laces.
|
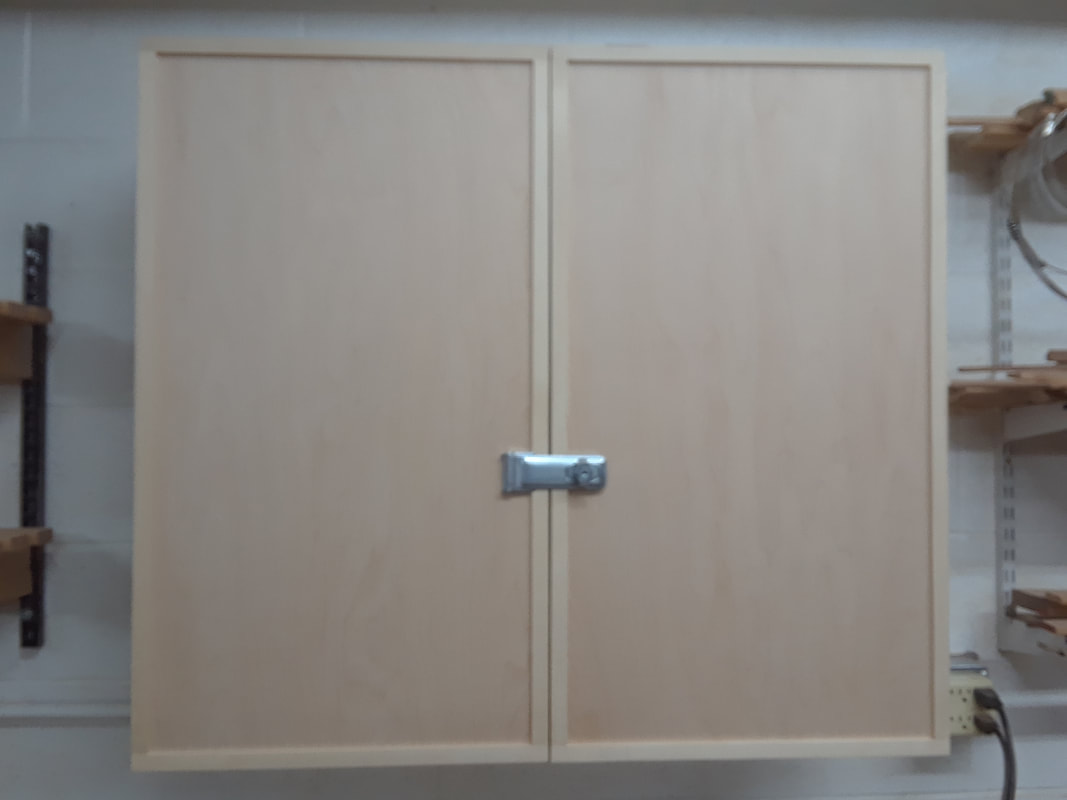
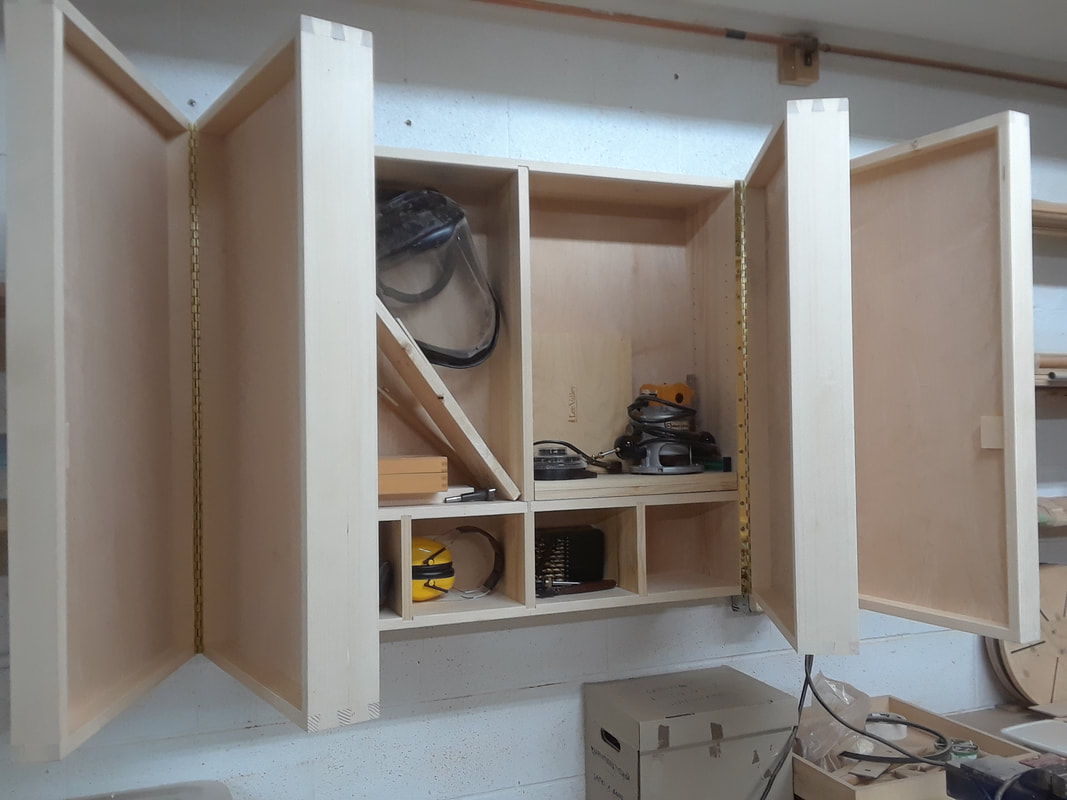
I built this wall mounted tool cabinet for the workshop to store my special tools that I prefer to keep for my own use. It has two pairs of doors that I can mount tools on and still provide easy access. I am slowly getting the cabinet fitted out with racks and hangers for saws, chisels, planes and the like. |
|
|
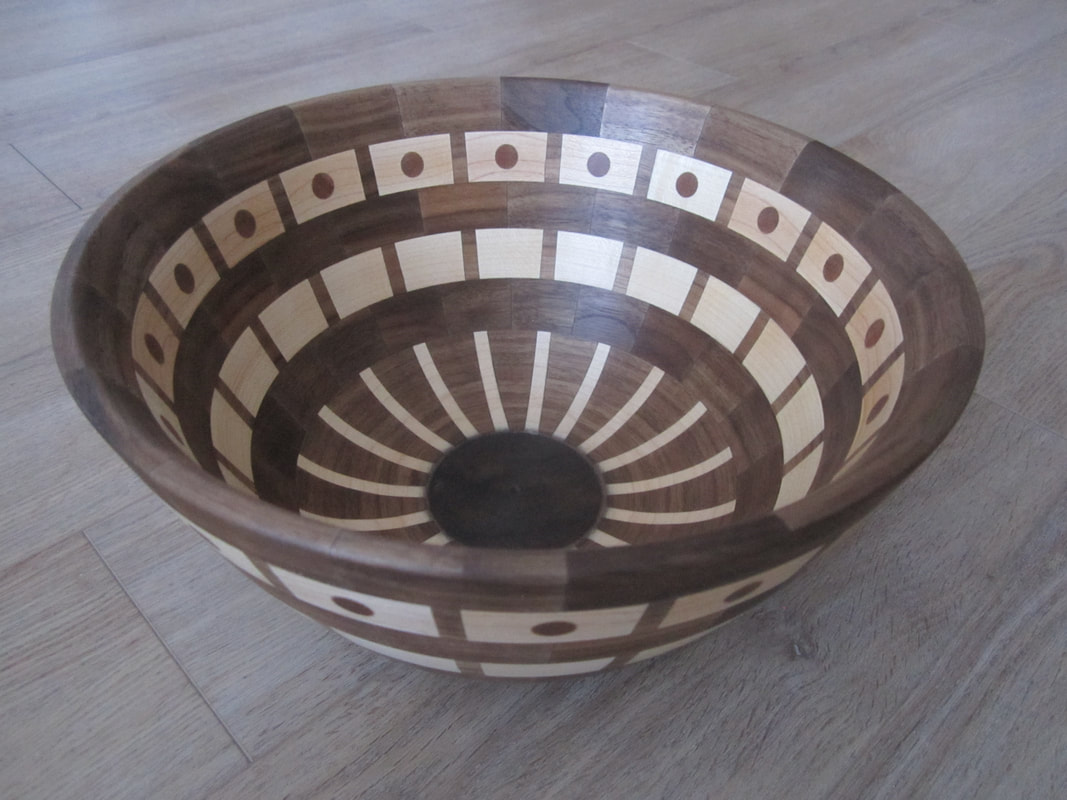
Below I describe how I make "bowls from boards" using a special jig and tilting the table on the bandsaw. Cutting with the jig renders semi-circular pieces with sloped sides which get glued together to form rings. The rings are then stacked largest to smallest and glued together to form a conical shape which I then mount on the lathe (using the 4-jaw chuck and a glue-block) and turn a slightly curved side profile. I have made a number of different patterns and you can find photos of them under my Turnings page. Photos of the making process are provided below along with a brief description.

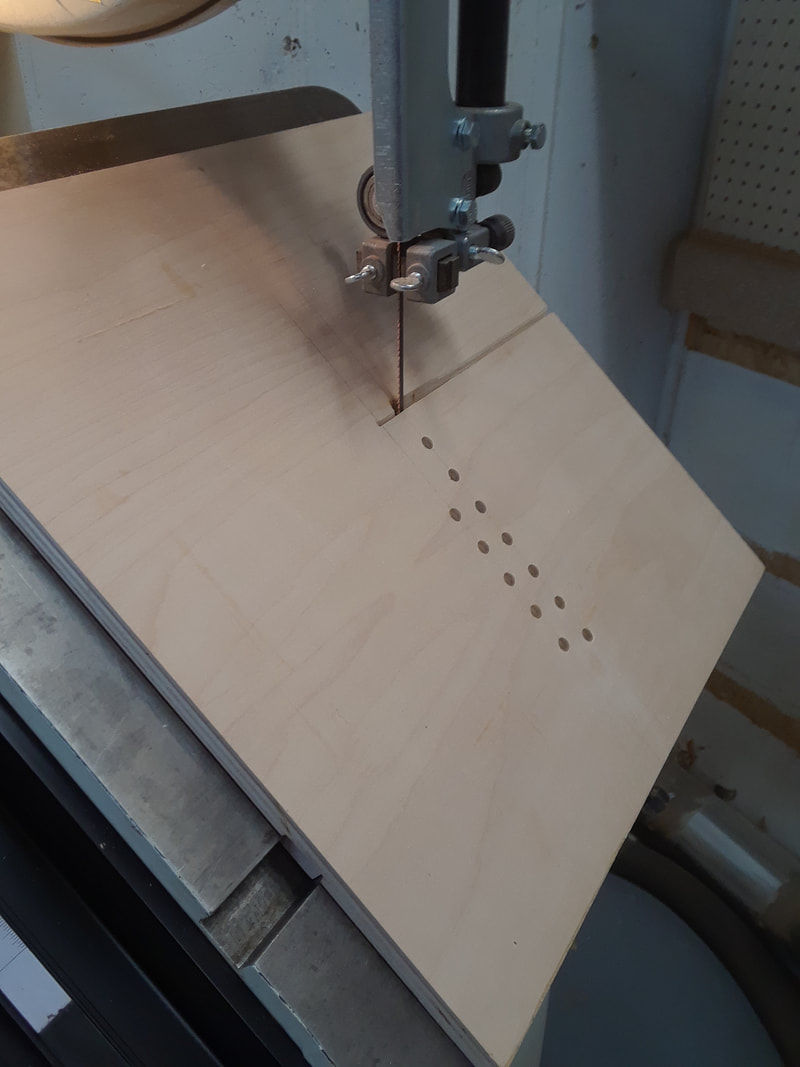
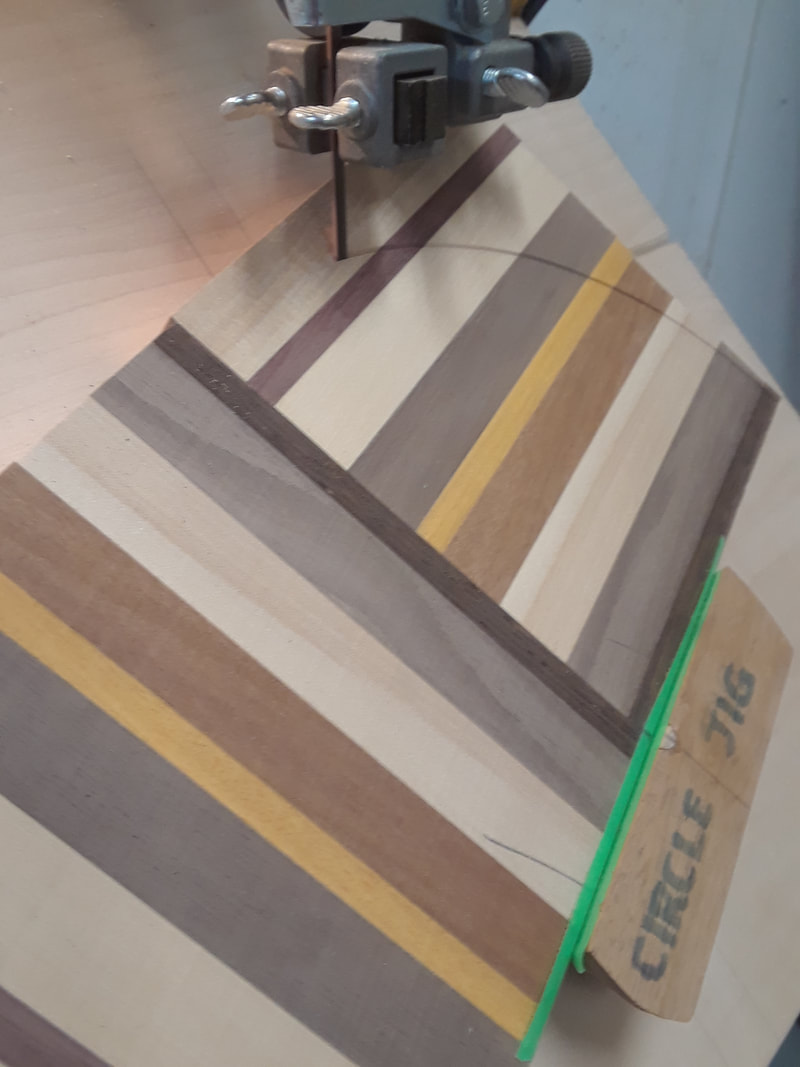
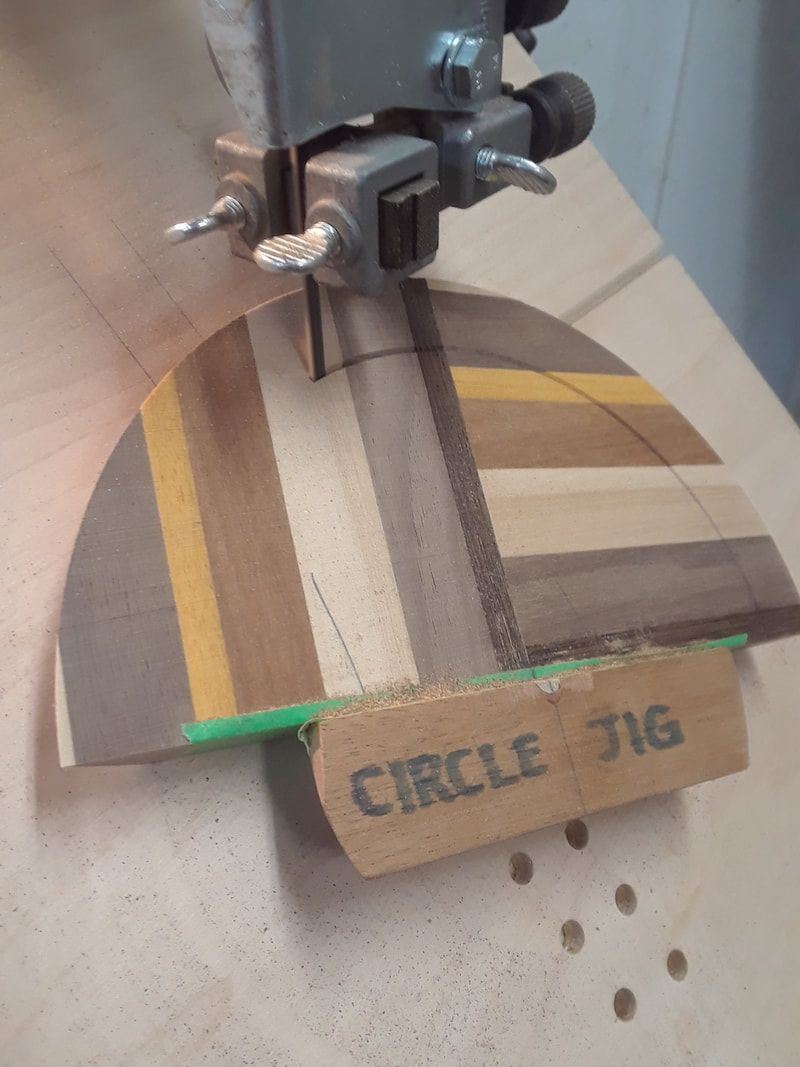

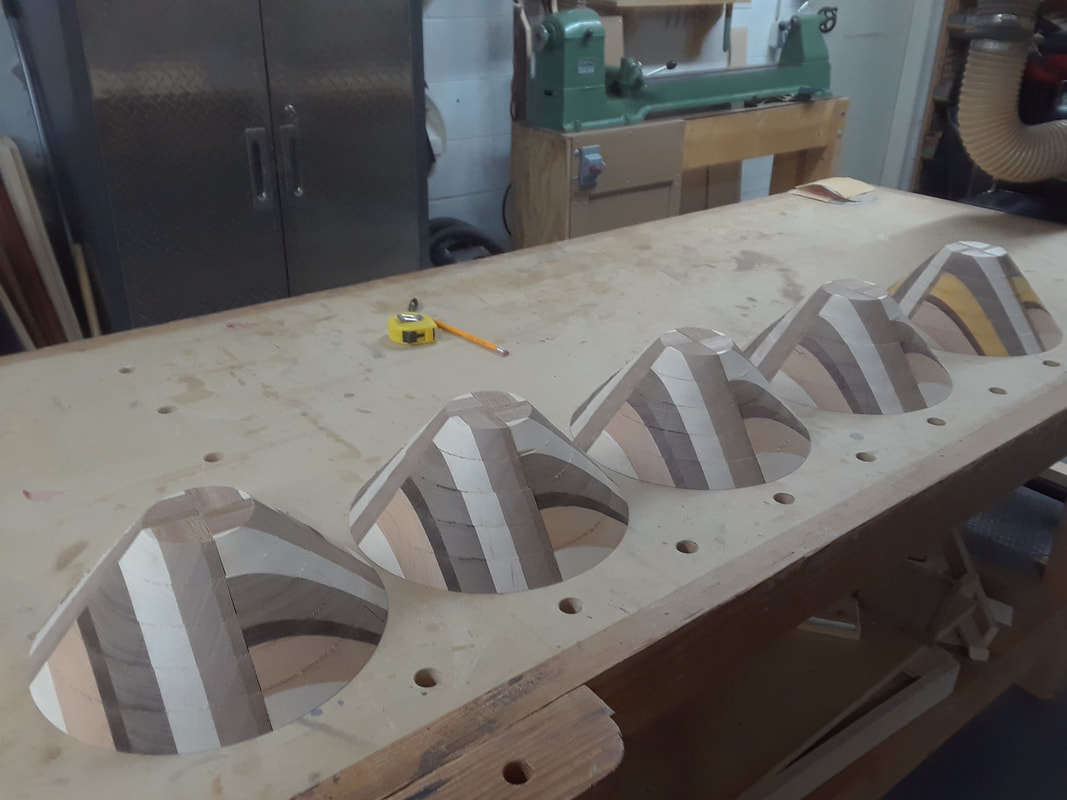

I select a number of pieces of wood at least 22 inches long and wide enough to make up 5 1/2 inches in width. Each piece is approximately 7/8" thick. These pieces are glued and clamped together to form a board 5 1/2" wide x 22" long x 7/8" thick and then sanded smooth and parallel on both sides. The board is then cut into four equal pieces approximately 5 1/2" long. Alternate pieces are rotated 90 degrees and glued to each other forming two pieces 5 1/2" x 11'". I then attach these pieces on to my jig using masking tape and crazy glue which holds fast but is easy to remove and clean up. Then I tilt the bandsaw table to an angle (normally between 40 and 45 degrees) depending on the finished material thickness. at 13/16" thick, the angle is around 41 degrees. By positioning the centre pin of the part marked "circle jig" into the holes of the base of the jig, I rotate the workpiece gently into the blade and cut a semi-circle. By moving the centre pin closer to the blade I get a series of progressively smaller semi-circles. I cut these semi-circles from both of my workpieces as shown in the bottom left photo. Then I start with the outer ring and glue the two semi-circles together. I continue gluing the next size ring together and also to the larger ring below it, following this process until all the pieces are glued together to form an inverted cone. It is difficult to clamp these pieces so I use Titebond III glue and I add weights to the top until the glue sets up. I then glue the assembled conical shaped rough bowl on to a block that is held in the lathe chuck and proceed to turn a slight curve externally and internally, sand and apply the finish. The bowl is finally cut free from the mounting block and the bottom is sanded smooth. While the bowls shown are made up with multiple pieces of various hardwoods, the same principle can be applied for a board of one material, as long as each piece is twice as long as it is wide.